Установка virtualbox guest additions
Содержание:
- Using VirtualBox Guest Addition features
- Shared Folders and Clipboard
- What Is VirtualBox?
- What Are Guest Additions in VirtualBox?
- Установка гостевых дополнений из репозиториев
- Установка гостевых дополнений из Virtual Box Manager
- Почему вы должны использовать гостевые дополнения VirtualBox?
- Non-Issues[edit]
- Footnotesedit
- Migration to Guest Additions Packages[edit]
- Guest Additions Make VirtualBox Even Better
- How to Install Virtualbox Guest Additions in Linux Mint
- Установка гостевых дополнений VirtualBox
- How to Build Guest Additions on Windows Operating Systems in Oracle VM VirtualBox
- Enable shared folders
- Поддерживаемые операционный системы:
- Installation in EFI mode (optional)
- Whonix ™-Default[edit]
Using VirtualBox Guest Addition features
Here are some screenshots for enabling/using helpful features of VirtualBox Guest Additions in use:
Configure Drag And Drop (any files)
You can enable drag and drop from the top menu -> Devices ->Drag and Drop -> Bidirectional.
With Bidirectional, you can drag and drop from guest to host and from host to guest, both.

Drag and Drop
Configure Shared Clipboard (for copy-pasting)
Similarly, you can enable shared clipboard from the top menu -> Devices -> Shared Clipboard -> Bidirectional.

Shared Clipboard
Uninstalling VirtualBox Guest Additions (if you don’t want to use it anymore)
Navigate to the CD image and open it in terminal (Right Click inside directory > Open in Terminal):

Open in Terminal
Now enter:
However, in some cases you might have to do some more cleanup. Use the command:
Note: Replace VBoxGuestAdditions-version with the right version (you can hit tab to autocomplete; in my case it is VBoxGuestAdditions-6.0.4).
The virtual Guest Additions PCI device provides access to a service on the host called the Host-Guest Communication Manager (HGCM). This service is responsible for providing functionality for Shared Folders, Shared Clipboard and making configuration changes to the guest itself.
All requests to the communication manager are made with the same packet header, and there are 5 values used for the packet type field:
| Value (decimal) | Request Type |
|---|---|
| 60 | Connect |
| 61 | Disconnect |
| 62 | Call Function (32-bit) |
| 63 | Call Function (64-bit) |
| 64 | Cancel Request |
After the standard Guest Addition Header, each communication manager packet (except the cancel request packet) has a second header, depending on the request type above.
Connect
| Offset (hex) | Length | Description |
|---|---|---|
| 0x20 | 4 | Location Type |
| 0x24 | 128 | Location |
| 0xA4 | 4 | Client ID |
The Location field contains the name of the library to connect. There are 4 pre-defined library names: VBoxSharedFolders, VBoxSharedClipboard, VBoxGuestPropSvc, VBoxSharedOpenGL
Additional libraries may also be accessed by providing the library name in the Location field.
The Location Type field should be set to 1 to connect to an additional library, and 2 to connect to one of the pre-defined libraries.
The Client ID is filled by the host after the request is complete. This value should be used in any further calls to this service.
Call Function
Both the 32-bit and 64-bit call function packets use the same service header, followed by a list of parameter records. 32-bit function parameter records are 12 bytes long, and 64-bit function parameter records are 16 bytes long.
| Offset (hex) | Length | Description |
|---|---|---|
| 0x20 | 4 | Type |
| 0x24 | 4 | Client ID |
| 0x28 | 4 | Function Code |
| 0x2c | 4 | Parameter Count |
| 0x30 | * | Parameters |
Parameter Types
| Value (decimal) | Request Type |
|---|---|
| 1 | 32-bit Value |
| 2 | 64-bit Value |
| 3 | Physical Address |
| 4 | Linear Address |
| 5 | Linear Address (Host-to-Guest only) |
| 6 | Linear Address (Guest-to-Host only) |
| 7 | Linear Address (Pre-Locked by Guest) |
| 8 | Linear Address (Host-to-Guest only, Pre-Locked by Guest) |
| 9 | Linear Address (Guest-to-Host only, Pre-Locked by Guest) |
Physical and Linear Address parameter values have the following structure:
| Offset (hex) | Length | Description |
|---|---|---|
| 0x00 | 4 | Buffer Length |
| 0x04 | 4/8 | Address (32-Bit/64-Bit) |
Functions
| Value (decimal) | Function | Parameters |
|---|---|---|
| 1 | Query Mappings | 3 |
| 2 | Query Map Name | 2 |
| 3 | Create Handle | 3 |
| 4 | Close Handle | 2 |
| 5 | Read | 5 |
| 6 | Write | 5 |
| 7 | Lock | 5 |
| 8 | List Directory | 8 |
| 9 | Information | 5 |
| 11 | Delete | 3 |
| 14 | Rename | 4 |
| 15 | Flush | 2 |
| 24 | Set File Size | 3 |
Query Mappings
The Query Mappings command returns a list of all of the shared folders configured for this guest. The buffer passed by the guest will be filled with mapping records, and the Count parameter will be set to the number of records returned. The Root value for each record will be used to reference this shared folder in future commands. If the buffer size is insufficient to hold all of the records, the buffer pointer size field will be set to the minimum size necessary to contain the entire list of mapping records. By default, all strings returned by the host will be in UCS2 encoding. Passing the UTF8 flag will force all requests to return strings in UTF8 format. The Automount Only flag will only return shared folders that have been marked as Automount in the guest configuration.
| Number | Parameter | Type |
|---|---|---|
| 1 | Flags | 32-Bit (0 — UCS2, 1 — UTF8, 2 — Automount Only) |
| 2 | Count | 32-Bit |
| 3 | Buffer | Pointer |
Mapping Record
| Offset (hex) | Length | Description |
|---|---|---|
| 0x00 | 4 | Flags (1 — New, 2 — Deleted) |
| 0x04 | 4 | Root |
| Number | Parameter | Type |
|---|---|---|
| 1 | Root | 32-Bit |
| 2 | Buffer | Pointer |
What Is VirtualBox?
Often referred to as the best virtual machine, VirtualBox is a powerful AMD64/Intel64 and x86 virtualization creation for both home and enterprise use. For the time being, VirtualBox is the only professional solution available freely as Open Source Software, which is one of the top reasons why its popularity has skyrocketed and thus several releases of it have taken place.
VirtualBox has been established with great community effort and is back by a company that is very dedicated to providing a first-class service in every aspect. It is downloaded in record numbers every day. It is currently the top Windows 10 virtual machine, and it does not seem this is going to change anytime soon.
Virtualbox Guest Additions
The VirtualBox Guest Additions consist of device drivers and system applications that optimize the operating system for better performance and usability. One of the usability features required in this guide is automated logons, which is why you need to install the Guest Additions in the virtual machine. For a Windows 7 desktop template, you also enable Windows media redirection for enhanced playback of multimedia content played in Windows Media Player (including content displayed in Internet Explorer).
To accessing this option In the Window containing the running virtual machine, select Install Guest Additions from the Devices menu. And the AutoPlay to run this guest additions will prompt.
What Are Guest Additions in VirtualBox?
The VirtualBox Guest Additions are extra pieces of software, included with your copy of VirtualBox, that enable better performance and functionality in virtual machines. You install Guest Additions inside the virtual machine to activate this functionality.
As you probably know, VirtualBox is a hypervisor, which allows you to create and use virtual machines. This means that you can install Windows and other operating systems inside VirtualBox and have them think that they’re running on actual hardware.
Read our full guide to using VirtualBox to get up to speed if you’re not familiar.
However, just because you get a working virtual machine running in VirtualBox doesn’t mean the experience is perfect from the start. There are certain elements of running an OS in an app window that are frustrating.
For example, on your main computer, Windows knows what resolutions it can display using the drivers from your graphics card. A virtual machine can’t do this, though, so it displays in a low resolution (such as 800×600) by default.
The Guest Additions of VirtualBox contain display drivers and other useful tools that make your virtual machine much more usable.
Установка гостевых дополнений из репозиториев
Если мы установили версию OSE Virtual Box из репозиториев, мы можем добавить гостевые дополнения из репозиториев в гостевой системе. Это установит гостевые дополнения, соответствующие версии Virtual Box, полученные из репозиториев. Не рекомендуется устанавливать их в более новые выпуски Virtual Box, полученные из репозитория Oracle (см. Ниже).
В качестве альтернативы мы можем установить пакет virtualbox-guest-extension-iso в хосте Ubuntu.
Файл.iso с образом OSE выпуска компакт-диска с гостевыми дополнениями будет установлен в каталог хоста. , Смонтируйте этот файл.iso как компакт-диск в настройках вашей виртуальной машины. После этого у вас будет доступ к компакт-диску с установщиком.
Установка гостевых дополнений из Virtual Box Manager
В случае, если гостевые дополнения не будут собраны, нам, возможно, придется установить заголовки ядра Linux (см. Как установить файлы заголовков ядра?) Или build-essential инструменты в дополнение. Также рекомендуется иметь ДКМС установлен (см. ниже — Примечание 4). Вы можете запустить эту команду в терминале, чтобы установить оба:
При выборе Устройства -> Установить гостевые дополнения (или нажмите Host + D в диспетчере виртуальных ящиков) компакт-диск гостевых дополнений.iso будет загружен, но не установлен в гостевой ОС. Для установки нам нужно запустить скрипт установщика как пользователь root или из запроса автозапуска (см. ниже).
GNOME Shell
Для установки гостевых дополнений у нас будет значок компакт-диска на рабочем столе, как только будет смонтирован виртуальный привод:
Следующий шаг — запустить скрипт autorun.sh (с правами root) на этом смонтированном компакт-диске, открыв диск и нажав кнопку «Запустить программное обеспечение». Это соберет и установит необходимые модули ядра vbox.
Единство
Гостевые дополнения монтируются как виртуальный компакт-диск, видимый на панели запуска:

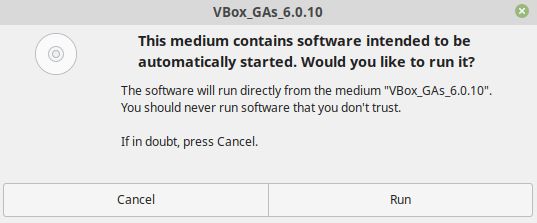
Если система настроена на автозапуск компакт-диска, она должна просто открыть следующее диалоговое окно автозапуска (если не выбрать символ компакт-диска, выберите «Открыть», затем выберите » Открыть запрос автозапуска»).

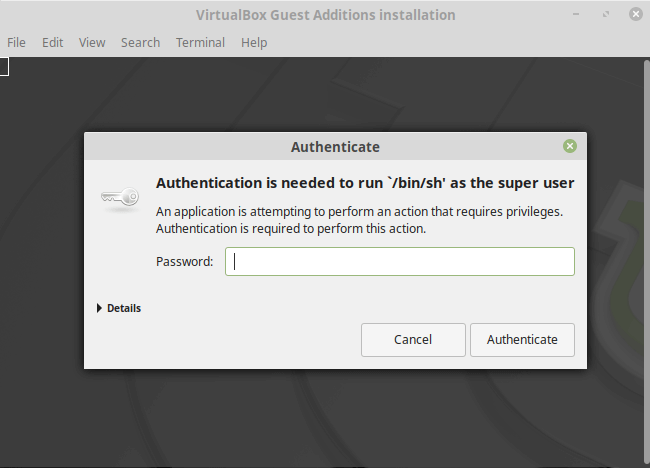
После ввода ваших учетных данных для root-доступа гостевые дополнения будут создаваться, как видно из вывода терминала:

Нажмите Return, чтобы закрыть терминал.
Почему вы должны использовать гостевые дополнения VirtualBox?
С включенными гостевыми дополнениями VirtualBox использование виртуальной машины становится намного удобнее. Не веришь мне? Вот важные функции, которые предлагает гостевые дополнения:
- Интеграция указателя мыши: вам больше не нужно нажимать какие-либо клавиши, чтобы «освободить» курсор от гостевой ОС.
- Общий буфер обмена: с установленными гостевыми дополнениями вы можете копировать и вставлять данные между гостевой и хост-операционной системами.
- Перетаскивание: вы также можете перетаскивать файлы между хостом и гостевой ОС.
- Общие папки: Моя любимая функция; эта функция позволяет обмениваться файлами между хостом и гостем. Вы можете указать VirtualBox обрабатывать определенный каталог хоста как общую папку, и программа сделает его доступным для гостевой операционной системы как сетевой ресурс, независимо от того, есть ли у гостевой системы сеть.
- Улучшенная поддержка видео: пользовательские драйверы видео, которые устанавливаются с гостевыми дополнениями, предоставляют вам сверхвысокие и нестандартные режимы видео, а также повышенную производительность видео. Это также позволяет изменить размер окна виртуальной машины. Разрешение видео в гостевой системе будет настроено автоматически, как если бы вы вручную вводили произвольное разрешение в настройках дисплея гостевой системы.
- Бесшовные окна: отдельные окна, которые отображаются на рабочем столе виртуальной машины, могут быть сопоставлены на рабочем столе хоста, как если бы основное приложение фактически выполнялось на хосте.
- Общие каналы связи хоста/гостя: гостевые дополнения позволяют вам контролировать и мониторить действия гостевой системы. «Свойства гостя» предоставляют общий механизм на основе строк для обмена битами данных между гостем и хостом, некоторые из которых имеют особые значения для управления и контроля гостевой системы. Приложения могут быть запущены на гостевой машине с хоста.
- Синхронизация времени: благодаря гостевые системы будут регулярно синхронизировать время с хост-машиной. Параметры механизма синхронизации времени могут быть настроены.
- Автоматические входы в систему: это может быть полезной функцией.
Под впечатлением от функций, которые предоставляет гостевое дополнение? Давайте посмотрим, как вы можете установить VirtualBox Guest Additions в Ubuntu Linux.
Non-Issues[edit]
If the following message appears during a kernel upgrade, it is a non-issue.
None.
Footnotesedit
- Host -> Whonix-Gateway clipboard sharing enable by default?
-
https://forums.whonix.org/t/security-risks-of-virtualbox-shared-folders/10119
-
To learn more about VirtualBox shared folders, see: .
-
Admittedly, this recommendation does not have a strong rationale. Disabling additional features in other virtualizers or general applications will similarly lead to less code paths being utilized and arguably increasing security. VirtualBox software is not special in this regard.
- Because otherwise you cannot change VirtualBox VM settings.
- Using /lib/systemd/system/mnt-shared-vbox.service .
-
If the option is unavailable, upgrade VirtualBox.
-
Alternatively folder can be chosen. The VirtualBox default means that folder would be owned by owner and group .
-
This is specific to the VirtualBox version; newer versions do not have this option anymore.
Check if this setting should persist after restart of the virtual machine. Otherwise this setting will be temporary. -
This step is required. Quote :
-
↑
is still installed by default. Should there be issues with , as there was in past due to unavailability, then it’s easier to fall back to that solution. ] (installation helper created by Whonix developers) is also still installed by default for the same purpose. -
Might still be used by users who Release Upgradeed from Whonix 15 to Whonix 16.
-
Installation of VirtualBox guest additions from CD might also cause issues.
- http://www.webcitation.org/6HqJVN0br
-
https://www.whonix.org/w/index.php?title=Ga&action=edit
Whonix is Supported by Evolution Host DDoS
Protected VPS. Stay private and get your VPS with Bitcoin or Monero.
| Fosshost | About Advertisements |
Search engines: YaCy | Qwant | ecosia | MetaGer | peekier | Whonix Wiki
Follow:
Support:
Donate:
Did you know that anyone can edit the Whonix wiki to improve it?
Priority Support | Investors | Professional Support
Whonix | ENCRYPTED SUPPORT LP | Freedom Software / Open Source (Why?)
The personal opinions of moderators or contributors to the Whonix project do not represent the project as a whole.
Migration to Guest Additions Packages[edit]
- Whonix 15 Release Upgradeed to Whonix 16: This is recommend.
- Whonix 16 new downloads: No action required.
1. .
2. Install.
Install .
1. Update the package lists.
sudo apt-get update
sudo apt-get update
2. Upgrade the system.
sudo apt-get dist-upgrade
sudo apt-get dist-upgrade
3. Install the package.
Using command line parameter is in most cases optional.
sudo apt-get install --no-install-recommends virtualbox-guest-utils virtualbox-guest-x11
sudo apt-get install —no-install-recommends virtualbox-guest-utils virtualbox-guest-x11
The procedure of installing is complete.
3. Reboot.
4. Done.
Migration from VirtualBox Guest Additions ISO to Guest Additions packages has been completed.
Guest Additions Make VirtualBox Even Better
As we’ve seen, the Guest Additions make running virtual machines with VirtualBox much smoother. You should always take a few moments to install the Guest Additions when setting up a new VM, as there’s no drawback to doing so.
If VirtualBox isn’t working for you, check out how VirtualBox compares to other virtualization tools.
5 Free Ways to Block YouTube on Your Kid’s iPhone or iPad
Are your kids spending too long watching YouTube? Here are all the best ways to block YouTube on their iPhone or iPad.
Read Next
About The Author
Ben Stegner
(1749 Articles Published)
Ben is a Deputy Editor and the Onboarding Manager at MakeUseOf. He left his IT job to write full-time in 2016 and has never looked back. He’s been covering tech tutorials, video game recommendations, and more as a professional writer for over seven years.
More
From Ben Stegner
How to Install Virtualbox Guest Additions in Linux Mint
Log into Linux Mint (guest OS) and run the following command in a terminal window to update software packages.
sudo apt update
sudo apt upgrade
Please note that if a new Linux kernel is installed in the upgrade process, then you need to reboot Linux Mint virtual machine. After that, run the following command to install required packages for building kernel modules.
sudo apt install build-essential module-assistant
Next, prepare Linux Mint for building kernel module with the following command.
sudo m-a prepare
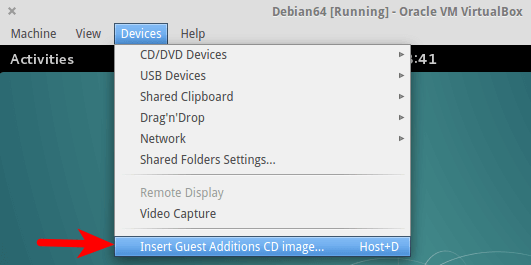
Then in the VirtualBox window menu bar, select Devices > Insert Guest Additions CD image.
If your host OS already has the CD image, then you will be asked if you want to run the software. Select Run.
Then you will need to enter your password in order to install the guest additions.
Output in terminal window.
Verifying archive integrity... All good.
Uncompressing VirtualBox 6.0.10 Guest Additions for Linux........
VirtualBox Guest Additions installer
Copying additional installer modules ...
Installing additional modules ...
VirtualBox Guest Additions: Starting.
VirtualBox Guest Additions: Building the VirtualBox Guest Additions kernel
modules. This may take a while.
VirtualBox Guest Additions: To build modules for other installed kernels, run
VirtualBox Guest Additions: /sbin/rcvboxadd quicksetup <version>
VirtualBox Guest Additions: or
VirtualBox Guest Additions: /sbin/rcvboxadd quicksetup all
VirtualBox Guest Additions: Building the modules for kernel 4.15.0-55-generic.
update-initramfs: Generating /boot/initrd.img-4.15.0-55-generic
VirtualBox Guest Additions: Running kernel modules will not be replaced until
the system is restarted
Press Return to close this window...
Once the guest additions is installed, press to close the terminal window and restart your Linux Mint virtual machine. Now the resizeable display should be working. The screen resolution of Linux Mint VM will adjust with the size of VirtualBox window. You can press right Ctrl and F keyboard shortcut to enter full-screen mode. You can now also configure shared folder and bidirectional shared clipboard.
Установка гостевых дополнений VirtualBox
Для улучшения работы с виртуальной машиной, и взаимодействия с ней, в виртуально установленной операционной системе нужно установить специальный набор инструментов, который называется «Гостевые дополнения» («Guest Additions»). Данный набор инструментов выпускается для следующих операционных систем:
- Windows (начиная с Windows NT 4.0, и заканчивая Windows 10);
- Linux (официально поддерживаются Oracle Linux, Fedora, Red Hat Enterprise Linux, SUSE (в том числе openSUSE), Ubuntu);
- Oracle Solaris;
- OS/2.
Для установки гостевых дополнений VirtualBox необходимо выполнить следующие действия:
- Включаем виртуальную машину и ждем загрузки ОС.
- В верхнем меню VirtualBox выбираем пункт «Устройства — Подключить образ диска Дополнений гостевой ОС…».
Дальнейшие действия зависят от того, какая операционная система установлена в VirtualBox:
Windows
- Если в системе не отключен автозапуск, то должен запуститься установщик дополнений гостевой ОС. Если же в системе выключен автозапуск, нужно запустить установщик вручную, найдя его на подключившемся диске в виртуальной машине, под именем VBoxWindowsAdditions.exe.
- Как и установка самого VirtualBox, установка гостевых дополнений максимально упрощена, и по сути представляет из себя нажатие кнопок «Next». С первым окном именно так и следует поступить.
- На следующем будет предложено выбрать место для установки гостевых дополнений. По умолчанию, рассматривается обычная для всех программ директория Program Files.
- Последним шагом, перед непосредственно самой установкой, будет выбор устанавливаемых компонентов:
- VirtualBox Guest Additions — собственно, сами гостевые дополнения VirtualBox;
- Start menu entries — ярлыки в меню «Пуск».
- Direct3D Support — третий компонент, который не выбран по умолчанию, является экспериментальной функцией по включению полноценного 3D ускорения в виртуальной машине. Для «простой» работы он не нужен.
- После нажатия на кнопку «Next» начнется установка гостевых дополнений, во время которой может появится окно с запросом на разрешения установки программного обеспечения для устройства (драйвер), которую необходимо одобрить.
- После установки дополнений потребуется перезагрузка компьютера, которую можно выполнить сразу (оставив отмеченным пункт «Reboot now»), или выполнив её позже самостоятельно (для этого нужно отметить пункт «I want to manually reboot later»).
- После перезагрузки произойдет множество полезных изменений — появится поддержка двухстороннего буфера обмена (о том, как его включить можно прочитать здесь), функция drag-n-drop между основной операционной системой и операционной системой в виртуальной машине, автоматический выбор разрешения экрана на основе размера окна VirtualBox и т. д.
Linux
В операционных системах семейства Linux, графический установщик гостевых дополнений отсутствует, вся установка происходит через терминал. Современные дистрибутивы прекрасно сами распознают файл автозапуска на образе с гостевыми дополнениями, и предлагают его запустить автоматически.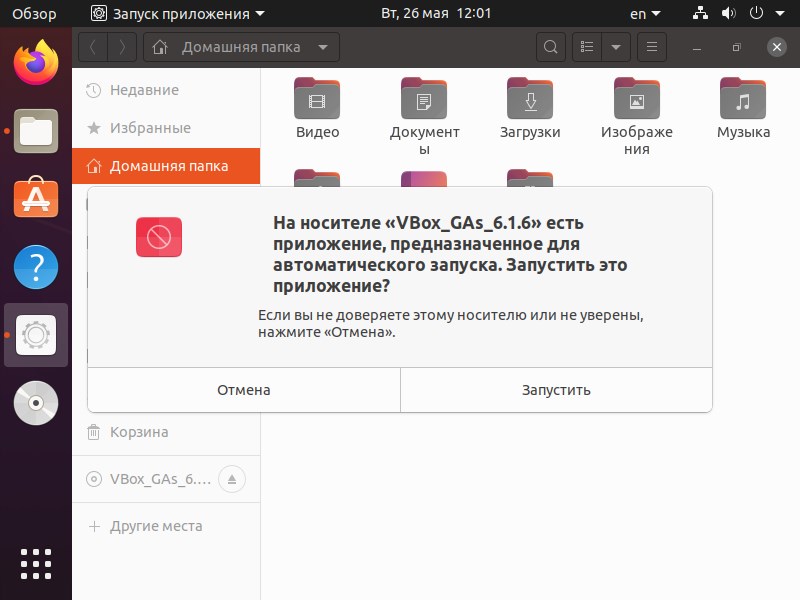
Можно так же запустить файл установки гостевых дополнений вручную. Для этого, нужно открыть терминал, и перейти в каталог, куда смонтирован виртуальный образ с файлами установки дополнений. Там же, нужно выполнить команду запуска файла установки:
После выполнения данной команды, начнется установка гостевых дополнений Linux, по завершению которой, понадобится перезагрузка системы.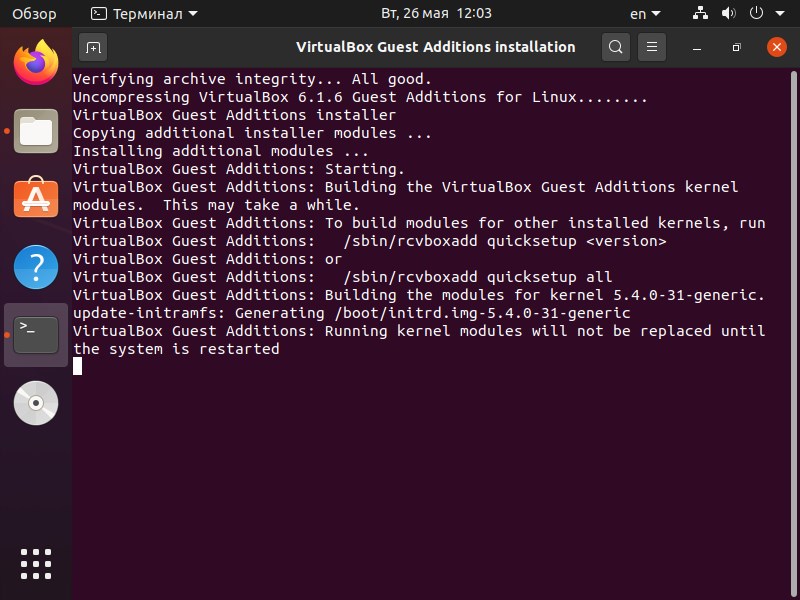
How to Build Guest Additions on Windows Operating Systems in Oracle VM VirtualBox
With Oracle VM VirtualBox, you can install Windows, Linux, and even MacOS operating systems by creating virtual machines on your physical computer.
After creating a new VM with VirtualBox, you will need to add the ISO file of the operating system to the CD/DVD partition. For example, after you add the Windows 10 ISO to the VM, you can start the operating system setup by running the VM.
However, after you setup Windows or Linux operating system with VBox, you need to add Guest Additions. In this article, we will review how to setup Guest Additions for Windows Hosts on Oracle VM software.
First of all, let’s talk briefly about what is VirtualBox Guest Software.
What is Guest Additions in VirtualBox?
Guest Software is an additional software for a virtual pc installed and running on the Oracle VM VBox program. Thanks to this package, additional features are added to virtual machines. For example, you can exchange files with your physical computer or use virtual computers in Full Screen Mode, Seamless Mode, and Scaled Mode.
How to Setup Guest Software for Windows Virtual Machine
Adding Oracle Client Packages on a Windows VM is simple and easy. Now, let’s install it for a VM step by step.
Follow the steps below in order to build VBox additions in Oracle software.
Step 1
After setting up a new VM with Oracle VBox click on Devices and then Insert Guest Additions CD image…

Step 2
If the Software setup wizard does not start, click on This Computer and then double click on the CD drive.

Step 3
In the Oracle VM Additions setup wizard, click Next.

Step 4
Do not change the setup location to avoid possible errors when installing additional software. Click Next to continue.

Step 5
In the Choose Component window, select the features to be installed as follows and click on the Install button to continue.

Step 6
Wait while client software is installed.

Step 7
After completing client software, restart the VM for the changes to take effect.

Step 8
After setting up client software for Windows Hosts, you can use the VM in full-screen mode. You can also transfer your files between your host and the virtual machine by using the drag-and-drop method.

Final Word
In this article, we have discussed how to install Guest Additions, an additional software for the Oracle VM virtualization program. Thanks for following us!
Related Articles
How to Install Windows 10 in a VM How to Create VM in Oracle VM VBox How to Clone VM in VBox on Windows 10 How to Take Snapshot in VBox on Windows 10 How to Install VM Guest Software on Linux Mint
No matter which method you will use to mount your folder, all methods require some steps first.
To avoid this issue , make sure the kernel module is properly loaded. It should be, since we enabled all guest kernel modules previously.
Two additional steps are needed in order for the mount point to be accessible from users other than root:
- the package created a group (done in a previous step);
- your user must be in user group.
Manual mounting
Use the following command to mount your folder in your Arch Linux guest:
# mount -t vboxsf -o gid=vboxsf shared_folder_name mount_point_on_guest_system
where is the Folder name assigned by the hypervisor when the share was created.
If the user is not in the vboxsf group, to give them access to our mountpoint we can specify the options and with the corresponding values of the user. These values can obtained from the command run against this user. For example:
# mount -t vboxsf -o uid=1000,gid=1000 home /mnt
Automounting
Note: Automounting requires the to be enabled/started.
In order for the automounting feature to work you must have checked the auto-mount checkbox in the GUI or used the optional argument with the command .
The shared folder should now appear as . If users cannot access the shared folders, check that has permissions or is owned by the group if using permissions . This is currently not the default if the directory is created by .
You can use symlinks if you want to have a more convenient access and avoid to browse in that directory, e.g.:
$ ln -s /media/sf_shared_folder_name ~/my_documents
Mount at boot
You can mount your directory with fstab. However, to prevent startup problems with systemd, should be added to . This way, the shared folders are mounted only when those mount points are accessed and not during startup. This can avoid some problems, especially if the guest additions are not loaded yet when systemd reads fstab and mounts the partitions.
sharedFolderName /path/to/mntPtOnGuestMachine vboxsf uid=user,gid=group,rw,dmode=700,fmode=600,noauto,x-systemd.automount
- : the value from the VirtualMachine’s Settings > SharedFolders > Edit > FolderName menu. This value can be different from the name of the real folder name on the host machine. To see the VirtualMachine’s Settings go to the host OS VirtualBox application, select the corresponding virtual machine and click on Settings.
- : if not existing, this directory should be created manually (for example by using ).
- / are directory/file permissions for directories/files inside .
As of 2012-08-02, mount.vboxsf does not support the option:
desktop /media/desktop vboxsf uid=user,gid=group,rw,dmode=700,fmode=600,nofail 0 0
Поддерживаемые операционный системы:
Windows:
- Windows XP SP3 (32-bit и 64-bit)
- Windows Vista SP1 и выше (32-bit и 64-bit).
- Windows Server 2008 (64-bit)
- Windows Server 2008 R2 (64-bit)
- Windows 7 (32-bit и 64-bit)
- Windows 8 (32-bit и 64-bit)
- Windows 8.1 (32-bit и 64-bit)
- Windows 10 RTM build 10240 (32-bit и 64-bit)
- Windows 10 RTM build 10586 (32-bit и 64-bit)
- Windows Server 2012 (64-bit)
- Windows Server 2012 R2 (64-bit)
Mac OS X (64-bit):
- 10.8 (Mountain Lion)
- 10.9 (Mavericks)
- 10.10 (Yosemite)
- 10.11 (El Capitan)
Linux (32-bit и 64-bit):
- Ubuntu 10.04 до 15.04
- Debian GNU/Linux 6.0 («Squeeze») и 8.0 («Jessie»)
- Oracle Enterprise Linux 5, Oracle Linux 6 и 7
- Redhat Enterprise Linux 5, 6 и 7
- Fedora Core / Fedora 6 до 22
- Gentoo Linux
- openSUSE 11.4, 12.1, 12.2, 13.1
- Mandriva 2011
Solaris hosts (64-bit):
- Solaris 11
- Solaris 10 (U10 и выше
Installation in EFI mode (optional)
Enabling EFI for Arch as guest is optional. If you want to install Arch Linux in EFI mode inside VirtualBox, you must change the firmware mode for the virtual machine. This must be done before installing Arch as guest, changing the option afterwards will result in unbootable machine unless the setting is reverted.
To enable EFI for a virtual machine using the graphical interface, open the settings of the virtual machine, choose System item from the panel on the left and Motherboard tab from the right panel, and check the checkbox Enable EFI (special OSes only).
Alternatively the same can be accomplished from the command line using VBoxManage:
$ VBoxManage modifyvm "Virtual machine name" --firmware efi
will set the firmware for the virtual machine to EFI with the matching the virtual machine’s CPU. To get a specific EFI bitness, set the firmware to for x86_64 EFI or for IA32 EFI.
After selecting the kernel from the Arch Linux installation media’s menu, the media will hang for a minute or two and will continue to boot the kernel normally afterwards. Be patient.
Starting with VirtualBox 6.1 the issue of forgetting NVRAM contents on shutdown is fixed. Proceed with the installation just as on a regular UEFI system.
Installation in EFI mode on VirtualBox < 6.1
Once the system and the boot loader are installed, VirtualBox will first attempt to run from the ESP. If that first option fails, VirtualBox will then try the EFI shell script from the root of the ESP. This means that in order to boot the system you have the following options:
- from the EFI shell every time;
- Move the bootloader to the default path;
- Create a script named at the ESP root containing the path to the boot loader application, e.g. .
- Boot directly from the ESP partition using a .
Whonix ™-Default[edit]
Note:
- From VirtualBox v6+ it is no longer necessary to power off the virtual machine.
- For better usability, package shared-folder-help has already added user to group .
- Navigate to the shared folder settings of the virtual machine: → → →
- Click the folder icon that has a symbol in the upper right-hand section of the screen.
- → Navigate to the folder you want to share.
- → Type: . A different folder name can be utilized, but is recommended so it is the same as the example documented below — do not use (without the trailing )!
- Check if you do not want to write to that folder from within the guest.
- Check .
- → Leave as is (leave it empty and do not make any changes).
- Check (if that option exists).
- Press to close shared folder dialog.
- Press to close VirtualBox settings.
- The process is now complete and the shared folder can be used.
VirtualBox shared folders are found inside the virtual machine in folder .
By default, VirtualBox uses the prefix .
In the above example, the folder will become . It can be opened using a file manager like Thunar. To open it using the the command line, run.
cd /media/sf_shared
cd /media/sf_shared