A beginner’s guide to mvc architecture in java
Содержание:
Domain Model и View Model
Последнее обновление: 31.10.2015
Модели, которые используются в приложении, бывают разными. В прошлой теме мы рассмотрели вывод и одновременно фильтрацию объектов Player:
public class Player
{
    public int Id { get; set; }
    public string Name { get; set; }
    public int Age { get; set; }
    public string Position { get; set; }

    public int? TeamId { get; set; }
    public Team Team { get; set; }
}
Модель Player в данном случае представляет модель домена, ее объекты хранятся в базе данных и чтобы их получить, мы
обращаемся через контекст данных к БД. Но в прошлой теме только функциональности этой модели оказалось недостаточно. Для передачи
данных в представление нам пришлось создать дополнительную модель:
public class PlayersListViewModel
{
    public IEnumerable<Player> Players { get; set; }
    public SelectList Teams { get; set; }
    public SelectList Positions { get; set; }
}
Это модель представления или view model, которая предназначена конкретно для вывода данных в некоторое представление
И важно
понимать отличие domain model от view model
Другая часто встречающаяся ситуация — редактирование. Нам надо редактировать игрока, но надо изменить не все свойства, а только часть. Опять же в этом случае создается
дополнительная модель представления, которая содержит те свойства, которые надо изменить. Например:
public class PlayerViewModel
{
    public int Id { get; set; }
    public int Age { get; set; }
    public string Position { get; set; }
}
И представление для редактирования тогда использует не модель Player, а модель PlayerViewModel. Тогда обработка введенных данных
могла выглядеть следующим образом:
public ActionResult Edit(PlayerViewModel playerModel)
{
    Player player = db.Players.Find(playerModel.Id);
    if (player == null)
        return HttpNotFound();
    player.Position = playerModel.Position;
    player.Age = playerModel.Age;
    db.SaveChanges();
    return RedirectToAction("Index");
}
В некоторых случаях модель домена может совпадать с моделью представления. Например, при создании нового игрока мы можем определить следующее представление:
@model NavigationProperty.Models.Player

@{
    ViewBag.Title = "Добавление игрока";
}

<h2>Добавление нового игрока</h2>

@using (Html.BeginForm())
{
    <fieldset>
        <legend>Футболист</legend>

        @Html.HiddenFor(model => model.Id)

        <p>
            Имя игрока <br />
            @Html.EditorFor(model => model.Name)
        </p>

        <p>
            Возраст <br />
            @Html.EditorFor(model => model.Age)
        </p>

        <p>
            Позиция на поле  <br />
            @Html.EditorFor(model => model.Position)
        </p>
        <p>
            Команда <br />
            @Html.DropDownListFor(model => model.TeamId, ViewBag.Teams as SelectList)
        </p>

        <p>
            <input type="submit" value="Добавить игрока" />
        </p>
    </fieldset>
}
Представление использует модель Player, метод контроллера также может получать эту модель и сразу сохранять ее в базу данных. То есть здесь domain model = view model.
Для маленьких приложений это вполне допустимо. Но, как правило, такие ситуации в реальных приложениях встречаются не часто и то в основном в очень небольших.
Для больших приложений или даже небольших, но которые постоянно расширяются, подобная ассоциация моделей может вылиться в проблемы
с поддержкой и развитием приложения. Поэтому рекомендуется для каждого отдельного представления создавать свою ViewModel.
НазадВперед
The Model (M)
The model layer encompasses your app’s data. No surprise there, but there are usually other classes and objects in your projects that you can include in this layer:
- Network code: You preferably only use a single class for network communication across your entire app. It makes it easy to abstract concepts common to all networking requests like HTTP headers, response and error-handling and more.
- Persistence code: You use this when persisting data to a database, Core Data or storing data on a device.
- Parsing code: You should include objects that parse network responses in the model layer. For example, in Swift model objects, you can use JSON encoding/decoding to handle parsing. This way, everything is self-contained and your network layer doesn’t have to know the details of all your model objects in order to parse them. Business and parsing logic is all self-contained within the models.
- Managers and abstraction layers/classes: Everyone uses them, everyone needs them, nobody knows what to call them or where they belong. It’s normal to have the typical “manager” objects that often act as the glue between other classes. These can also be wrappers around lower-level, more robust API: a keychain wrapper on iOS, a class to help with notifications or a model to help you work with HealthKit.
- Data sources and delegates: Something that may be less common is developers relying on model objects to be the data source or delegate of other components such as table or collection views. It’s common to see these implemented in the controller layer even when there’s a lot of custom logic that’s best kept compartmentalized.
- Constants: It’s good practice to have a file with constants. Consider putting these within a structure of structures or variables. That way, you can reuse storyboard names, date formatters, colors, etc.
- Helpers and extensions: In your projects, you will often add methods to extend the capabilities of strings, collections, etc. These too can be considered part of the model.
There are more classes and objects you could include, but these seem to be the most common. Again the goal is not to focus too much on the semantics of what is or isn’t a model. Rather, it is to have a solid foundation upon which to get your work done.
From a testing perspective, the model is an excellent candidate. You can confirm business logic, mock some of your networking or persistence methods or add tests around sensitive pieces of your model layer.
MTV
Фреймворк Django ввел новую терминологию MTV.
Примечание
В Django функции, отвечающие за обработку логики, соответствуют части
Controller из MVC, но называются View, а отображение соответствует части
View из MVC, но называется Template. Получилось, что:
- M -> M Модели остались неизменными
- V -> T Представление назвали Templates
- C -> V Контроллеры назвали Views
Так появилась аббревиатура MTV.
![]()
TADA!! Django invented MTV
Вся логика при таком подходе вынесена во View, а то, как будут отображаться
данные в Template. Из-за ограничений HTTP протокола, View в Django
описывает, какие данные будут представленны по запросу на определенный URL.
View, как и протокол HTTP, не хранит состояний и по факту является обычной
функцией обратного вызова, которая запускается вновь при каждом запросе
по URL. Шаблоны (Templates), в свою очередь, описывают, как данные
представить пользователю.
Паттерн MTV (Model-Template-View)
MTV фреймворки:
A Simple Implementation of MVC using Java
We will have the following three:
-
- StudentObject : the model.
-
- StudentView: view class to print details on the console.
- StudentController: a controller that stores data in studentObject and updates StudentView accordingly
Step 1: Create the Model
public class Student {
private String rollNo;
private String name;

public String getRollNo() {
return rollNo;
}

public void setRollNo(String rollNo) {
this.rollNo = rollNo;
}

public String getName() {
return name;
}

public void setName(String name) {
this.name = name;
}
}
The code is self-explanatory. It consists of functions to get/set roll number and names of the students. Let’s call it “student.java”.Step 2: Create the View
public class StudentView {
public void printStudentDetails(String studentName, String studentRollNo){
System.out.println("Student: ");
System.out.println("Name: " + studentName);
System.out.println("Roll No: " + studentRollNo);
}
}
This is simply to print the values to the console. Let’s call this “studentView.java”.Step 3: Create the Controller

public class StudentController {
private Student model;
private StudentView view;
public StudentController(Student model, StudentView view){
this.model = model;
this.view = view;
}
public void setStudentName(String name){
      model.setName(name);
}
public String getStudentName(){
return model.getName();
}
public void setStudentRollNo(String rollNo){
      model.setRollNo(rollNo);
}
public String getStudentRollNo(){
return model.getRollNo();
}
public void updateView(){
      view.printStudentDetails(model.getName(), model.getRollNo());
}
}
Call this “StudentController.java”. A cursory glance will tell you that this controller is just responsible for calling the model to get/set the data, and then updating the view. Now, let’s have a look at how all of this is tied together.Step 4: Create the main Java file
public class MVCPatternDemo {
public static void main(String[] args) {
//fetch student record based on his roll no from the database
Student model  = retriveStudentFromDatabase();
//Create a view : to write student details on console
StudentView view = new StudentView();
StudentController controller = new StudentController(model, view);
      controller.updateView();
//update model data
      controller.setStudentName("John");
      controller.updateView();
}
private static Student retriveStudentFromDatabase(){
Student student = new Student();
      student.setName("Robert");
      student.setRollNo("10");
return student;
}
}
This is called “MVCPatternDemo.java”. As you can see, it fetches the student data from the database or a function (in this case we’re using a function to set the values) and pushes it on to the Student model. Then, it initialises the view we had created earlier. Further, it also initialises our controller and binds it to the model and the view. The updateView() method is a part of the controller which updates the student details on the console. Step 5: Test the ResultIf everything goes right, the result should be:
Student:
Name: Robert
Roll No: 10
Student:
Name: John
Roll No: 10
If you get this as the output, congratulations! You’ve successfully implemented the MVC architecture using Java, albeit for a simple application. However simple, this application is enough to demonstrate the powers of the MVC architecture. 15 Must-Know Spring MVC Interview Questions
Wrapping Up…After so much said and done, it’s hard to emphasise more on the power of the MVC architecture in any web/desktop application these days. It provides an altogether new level of modularity to your code which makes it a lot more readable and maintainable. So, if you want to scale to new heights in your career as an application developer, getting hold of the MVC architecture and its working should be your top priority. Do drop by a comment and let us know how you like this article!
Понятие привязки моделей
Привязка моделей представляет собой элегантный мост между HTTP-запросом и методами C#, определяющими действия. Большинство приложений ASP.NET MVC Framework в той или иной степени полагаются на привязку моделей, в том числе простой пример приложения, созданный в предыдущем разделе. Чтобы увидеть привязку моделей в работе, запустите приложение и перейдите на /Home/Index/1. Результат показан на рисунке ниже:

Указанный URL содержит значение свойства UserId объекта User, который необходимо отобразить, например:
/Home/Index/1
Инфраструктура ASP.NET MVC Framework транслирует эту часть URL и применяет ее в качестве аргумента при вызове метода Index() класса контроллера Home с целью обслуживания запроса:
public ActionResult Index(int id)
Процесс, с помощью которого сегмент URL был преобразован в аргумент int метода, является примером привязки моделей. В последующих разделах будет описан процесс, инициируемый этой простой демонстрацией, и затем объяснены более сложные функциональные возможности привязки моделей.
Процесс, приводящий к привязке моделей, начинается сразу после получения запроса и его обработки механизмом маршрутизации. В этом примере приложения конфигурация маршрутизации не изменялась, поэтому для обработки запроса использовался стандартный маршрут, который среда Visual Studio добавляет в файл /App_Start/RouteConfig.cs. В качестве напоминания, этот стандартный маршрут приведен ниже:
Вопросы определения и работы маршрутов подробно рассматривались ранее, поэтому здесь они повторяться не будут
Для процесса привязки моделей важной частью является необязательная переменная сегмента id. При переходе на URL вида /Home/Index/1 последний сегмент, который указывает интересующий объект User, присваивается переменной маршрутизации id
Активатор действий использует информацию о маршрутизации для выяснения того, что для обслуживания запроса требуется метод действия Index(), но не может вызвать метод Index() до тех пор, пока не будет иметь подходящие значения для аргумента этого метода.
Стандартный активатор действий, ControllerActionInvoker, полагается на связыватели моделей при генерации объектов данных, которые требуются для вызова метода. Связыватели моделей определяются с помощью интерфейса IModelBinder, который показан в примере ниже. Мы еще вернемся к этому интерфейсу позже, когда будет рассматриваться создание специального связывателя модели.
В приложении MVC может присутствовать множество связывателей моделей, каждый из которых отвечает за привязку одного или более типов моделей. Когда активатор действий должен вызвать метод действия, он просматривает параметры, определяемые методом, и для каждого типа параметра ищет отвечающий за это связыватель модели.
В примере выше, приведенном в этом разделе, активатор действий будет проверять метод Index() и обнаружит, что он принимает один параметр int. Затем активатор действий найдет связыватель, отвечающий за значения int, и вызовет его метод BindModel().
Связыватель модели отвечает за предоставление значения int, которое может использоваться для вызова метода Index(). Это обычно означает трансформацию некоторого элемента данных запроса (такого как значения формы или строки запроса), но инфраструктура ASP.NET MVC Framework никак не ограничивает способ получения данных.
Позже будут предоставлены примеры специальных связывателей. Кроме того, будут продемонстрированы определенные возможности класса ModelBindingContext, экземпляр которого передается методу IModelBinder.BindModel().
What is MVC
With the project handy, it’s time to start learning about the Model, the View and the Controller. But first, what exactly is MVC?
Note: If you already know the concept of MVC, feel free to skip ahead to the next section, where you’ll start getting into best practices.
MVC is a software development pattern made up of three main objects:
- The Model is where your data resides. Things like persistence, model objects, parsers, managers, and networking code live there.
- The View layer is the face of your app. Its classes are often reusable as they don’t contain any domain-specific logic. For example, a is a view that presents text on the screen, and it’s reusable and extensible.
- The Controller mediates between the view and the model via the delegation pattern. In an ideal scenario, the controller entity won’t know the concrete view it’s dealing with. Instead, it will communicate with an abstraction via a protocol. A classic example is the way a communicates with its data source via the protocol.
When you put everything together, it looks like this:

Each one of these objects is meant to be separate from the other, and each fulfills a specific role. When building an app that uses a specific pattern, in this case MVC, the goal is to adhere to the pattern when building all layers of your app.
Apple’s MVC documentation explains these layers in detail and can give you a good theoretical understanding. From a practical perspective, though, it falls a little short.
In this tutorial, you’ll learn to treat MVC as a pattern and not as a strict rule that you must never break. As is the case with many things in software development, nothing is perfect and neither is MVC. There are gray areas that you’ll run into, but no decision you make is the wrong decision. As long as you don’t have files that are too big, or code that is difficult to expand upon, then you’re likely doing a good job. Use MVC — and other patterns for that matter — as architectural guidelines and foundations for your app.
Having said that, it’s time to look at each layer in more detail.
The Advantages of the MVC Architecture
A common problem faced by application developers these days is the support for different type of devices. The MVC architecture solves this problem as developers can create different interfaces for different devices, and based on from which device the request is made, the controller will select an appropriate view. The model sends the same data irrespective of the device being used, which ensures a complete consistency across all devices.The MVC separation beautifully isolates the view from the business logic. It also reduces complexities in designing large application by keeping the code and workflow structured. This makes the overall code much easier to maintain, test, debug, and reuse.
Альтернатива MVC — ADR
Сам шаблон MVC в контексте веб-разработки тоже имеет некоторые недостатки. Обработчики запросов объединяются в виде методов-действий внутри одного класса-контроллера. Это ведёт к тому, что для того, чтобы совершить одно действие, нужно проинициализировать весь контроллер, внедрив в него зависимости, необходимые для всех его действий. Это тоже нарушение SRP. Так же часто возникает проблема правильной группировки действий по контроллерам.
Пол М. Джонс предложил альтернативный шаблон — ADR (реализованный на PHP), некое подобие которого можно встретить в других библиотеках. У этого шаблона есть преимущества перед MVC:
- Замена классов-контроллеров с методами-действиями на отдельные классы-действия. Это дает несколько плюсов:
- Нет необходимости внедрять все зависимости, необходимые для целой группы действий, достаточно лишь тех, которые нужны для конкретного действия.
- Нет дилеммы, как сгруппировать действия в контроллеры: по иерархии страниц или по смыслу, так как действия — отдельные классы. Можно организовать произвольное дерево папок с такими классами.
- Нет необходимости использовать Reflection-механизмы для поиска нужного метода и подстановки параметров. Все данные можно передавать через конструктор наряду с зависимостями. Таким образом у действия остается только один метод — «Исполнить», что приводит все действия в соответствие одному интерфейсу.
- Responder более гибок, чем View в широко известных фреймворках: в зависимости от ситуации он может выбирать, какой шаблон использовать, или вообще ответить в виде XML или JSON или любом другом формате.
Остается ждать или попробовать самим реализовать ADR-фреймворк на .NET.
Всем хорошего кода и тонких контроллеров!
Putting it all Together
Now that you have a better understanding of the layers involved in the MVC pattern, it’s time to see it in action with this tutorial’s sample app.
Open the tutorial’s sample project and run the app. This app is a WWDC-like app that shows sessions and attendees for the event. The app loads data from JSON files in the app bundle on launch. Loading the data triggers the controllers to update the view and begin waiting for user interaction.
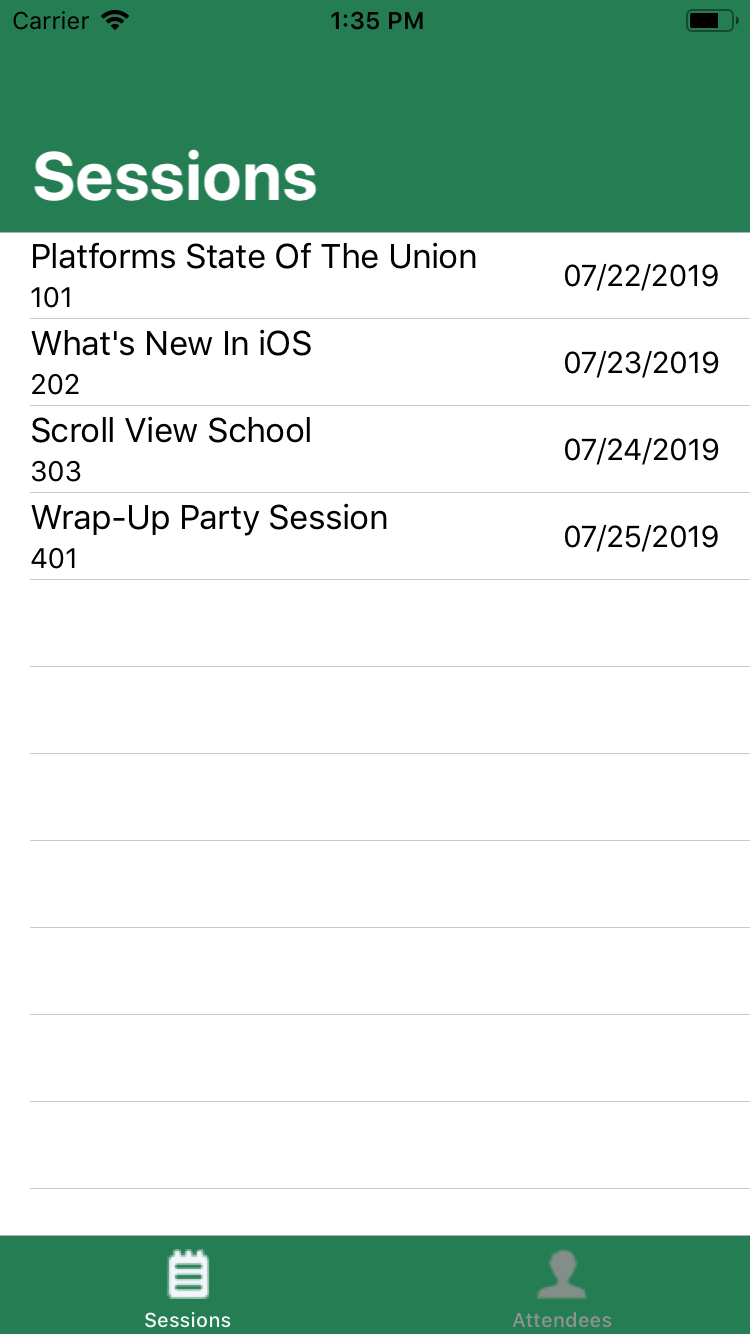
To start, expand the Model folder. The three “pure” model classes are , and . Note how these conform to so parsing from a JSON response is simple.
From there, you have other model files that are part of your network calls. This tutorial’s project loads a file from the app’s bundle, but you can add a remote URL to load a file or call a web service. The main classes are:
- Network: A wrapper around
- NetworkError: To handle different errors during the request/response process
- WebService: To add a helper method for loading both attendees and sessions
Of note is Network.swift, which has a method that uses generics to request JSON from a URL and parse it into an object type you specify in the method call. It handles HTTP responses and codes, errors, parsing, concurrency and making the call for you.
These files are small, straightforward, contain their own logic and you can test them with, at most, some mock methods.
Moving on to the view, it’s mostly contained in your storyboard files. This is a good thing as it’s not only more visual, but reducing the lines of code you write means reducing the amount of possible bugs you can introduce.
You may also have view logic in files, as is the case with SessionCell.swift, particularly when you do custom animations or UI elements. Your views should not know about business logic, interact with or know about model objects or do anything that doesn’t pertain to the view itself.
Testing components in the view layer, from a pure unit test perspective, is not so simple or useful, especially when dealing with XIBs or storyboards. This is because programmatically creating views or controllers will not trigger all methods in the view lifecycle or set up non-programmatic constraints. You can do UI testing and ensure that your tests also cover the view layer.
Finally, you get to the controller layer, this is where things get interesting as they act as the glue between view and model. and have the same concept. These display a list of items that you can select to view details. When you present the details for a selected item, you use the
Some things to note are:
- The is in charge of loading the event data and then passing it to each of the controllers.
- When the controller receives data, it triggers a reload of the table with the data.
- The controllers act as the data source and delegate of the table view.
- The controllers handle passing the details information when the user selects a session or event.
It’s all very lean, clean and easy to understand. You could even, for more robust projects, create separate classes or objects to act as data sources or delegates, further simplifying your controllers.
There is no heavy reliance on completion blocks, delegation (outside of what the table view needs) or mixing up business logic in views or controllers. You also don’t have the dreaded “MVC: massive view controllers.” This occurs when too much of your business logic lives inside of the controller.
Some tips to help you notice when an item in a layer may be overstepping its boundaries are:
- The controller is doing network requests, parsing or persistence.
- The controller (or any file) has hundreds or thousands of lines of code.
- Views accept model objects to “configure” themselves or set up UI elements for display.
- Controllers are doing a lot of business logic, calculations, data wrangling or manipulation.
Other Information
MVC is often seen in web applications, where the view is the actual HTML page, and the controller is the code that gathers dynamic data and generates the content within the HTML. Finally, the model is represented by the actual content, usually stored in a database or XML files, and the business rules that transform that content based on user actions.
Though MVC comes in different flavors, control flow generally works as follows:
- The user interacts with the user interface in some way (e.g. presses a button).
- A controller handles the input event from the user interface, often via a registered handler or callback.
- The controller notifies the model of the user action, possibly resulting in a change in the model’s state. (e.g. controller updates user’s shopping cart).
- A view uses the model (indirectly) to generate an appropriate user interface (e.g. the view produces a screen listing the shopping cart contents). The view gets its own data from the model. The model has no direct knowledge of the view.
- The user interface waits for further user interactions, which begins the cycle anew.
By decoupling models and views, MVC helps to reduce the complexity in architectural design, and to increase flexibility and reuse.