Ds4windows 2.0 download for windows 10,7
Содержание:
- Решение проблем с дистанционным воспроизведением
- Подключение и настройка геймпада на Windows 10, 8, 7
- Вариант 3. Покупка универсального геймпада
- Дистанционное воспроизведение ps4 на pc windows 8
- Steam
- Step 1: Connect your PS4 Controller via USB or Bluetooth
- Download DS4Windows
- Conclusion: DS4Windows
- What do I need to emulate PS4 controller?
- Способы подключения
- Что делать дальше
- Using a PS4 controller in Steam
- Solution 3: Uninstalling Windows Update
- Подключение джойстика при помощи Bluetooth-адаптера
- USB подключение геймпада
- Connect the PS4 controller to your PC via Bluetooth
- Troubleshooting
- Enable Hide DS4 Controller Option
- Best Alternative — InputMapper
- Steam
- Update DS4 Windows
Решение проблем с дистанционным воспроизведением
Диагностируйте и устраняйте проблемы с дистанционным воспроизведением.
Проверьте сетевое соединение вашей консоли
Минимальная скорость соединения для загрузки данных в сеть и из сети – не менее 5 Мбит/с. Выполните следующие действия, чтобы убедиться, что ваше соединение соответствует этим требованиям.
Консоль PS5: Выберите Настройки > Сеть > Статус соединения, затем выберите Проверить соединение с Интернетом.
Переустановите приложение «Дистанционное воспроизведение PS» на своем устройстве
Удалите приложение «Дистанционное воспроизведение PS», следуя приведенным ниже инструкциям, затем переустановите приложение.
На панели управления щелкните по кнопке Программы и компоненты и удалите приложение Дистанционное воспроизведение PS.
Перетащите значок Дистанционное воспроизведение PS из папки «Приложения» в корзину. Затем выберите Finder > Очистить корзину.
Нажмите и удерживайте значок приложения «Дистанционное воспроизведение», затем выберите Удалить.
Низкое разрешение изображения при дистанционном воспроизведении на PS4
Вы можете изменить качество видео дистанционного воспроизведения на PS4, чтобы улучшить соединение. На экране запуска приложения «Дистанционное воспроизведение PS» на вашем устройстве выберите Настройки, а затем Качество видео для дистанционного воспроизведения. Выберите Разрешение > Стандартное или Низкое, а также Частота кадров > Стандартная.
Пустой экран на PC при настройке дистанционного воспроизведения PS?
Попробуйте установить последнюю версию графического драйвера. Чтобы загрузить последнюю версию драйверов и ознакомиться с инструкцией по их установке, обратитесь к производителю своей видеокарты.
Подключение и настройка геймпада на Windows 10, 8, 7
Начнем с базы. Для подключения геймпада вам понадобится сам геймпад и программа для последующей настройки (если это старые игры).
На выбор есть четыре разных программы:
- MotionJoy Famepad Tool;
- JoyToKey;
- ScpToolkit;
- Xpadder.
О нюансах каждой программы мы расскажем отдельно ниже.
Универсальный способ подключения к Windows при помощи ScpToolkit
Этот способ называется универсальным так как работает на всех версиях Windows. К тому же он не требует от вас особых навыков и настройка занимает всего 2 минуты. Чтобы подключить геймпад, вам нужно:
- скачать ScpToolkit для своего ПК;
- установите приложение;
- подключите джойстик к компьютеру и запустите ScpToolkit;
- поставьте галочки напротив драйверов, которые нужно установить (зависит от используемого геймпада);

нажмите кнопку Install и дождитесь скачивания и установки драйверов.
Теперь можно использовать джойстик в качестве управления и играть.
Подключение джойстика с помощью MotionJoy Famepad Tool
Это еще один набор драйверов и утилит для операционных систем Windows. Установка простая, программа понятная и не занимает много места на вашем ПК.

Программа не только помогает в установке драйверов, но и позволит вам настроить кнопки и их значения как вам удобно. Чтобы подключить геймпад с помощью MotionJoy Famepad Tool, нужно:
- скачать установочный файл и установить программу;
- подключить джойстик к ПК;
- выбрать режим подключения;
- настроить необходимые кнопки;
- нажать “Старт”.

На этом настройка и установка закончены и вы можете приступить к игре.
Подключение с помощью JoyToKey
Это идеальная программа для геймеров, использующих Windows 10. JoyToKey позволит использовать геймпад даже в тех играх, которые его не поддерживают.

Чтобы начать работу с JoyToKey, вам нужно:
- скачать программу и установить на свой компьютер;
- подключить геймпад к компьютеру;
- открыть параметры игры и скопировать кнопки, которые вы будете применять в ней;
- назначить эти кнопки для геймпада;
- запустить игру.
Единственный минус этой программы — она полностью на английском языке, но проблем с настройкой вы не встретите.
Программа Xpadder (для Windows)
Эта программа является аналогом предыдущего варианта. Позволяет эмулировать нажатие кнопок на мышке и клавиатуре при помощи геймпада. Софт предназначен для тех игр, которые не могут по умолчанию управляться с помощи джойстиков.
Чтобы воспользоваться Xpadder, вам нужно:
- скачать программу и открыть файл xpadder.exe;
- нажать три раза кнопку “Запуск” и ждать окончания установки;
- запустить программу и подключить геймпад к компьютеру;
- нажмите на иконку с изображенным геймпадом;
- выберите пункт “Настройки”;
- загрузите изображение контроллера, похожего на ваш геймпад;
- настройте кнопки на джойстике;
- нажмите “Принять”.
Если похожего джойстика нет в предложенных файлах, вы можете сфотографировать свой и загрузить его в папку “Изображения Контроллера”.

Вариант 3. Покупка универсального геймпада
Безусловно, контроллер PS3 красив и удобен. Но есть ли смысл плясать с бубном, подключая его к ПК? Если у вас нет желания возиться с установкой, можно поискать универсальный джойстик, который поддерживает и DirectInput, и XInput. Соответственно, вы сможете использовать его как с Playstation3, так и с обычным компьютером. Цена вопроса невысока: например, вот такой геймпад Logitech G Gamepad F310 стоит всего 1500 руб.
Правда, это проводной вариант — модели с подключением по Bluetooth будут дороже.
- Как подключить Steam Link к телевизору и начать играть
- Как подключить NVidia Shield к компьютеру?
Дистанционное воспроизведение ps4 на pc windows 8
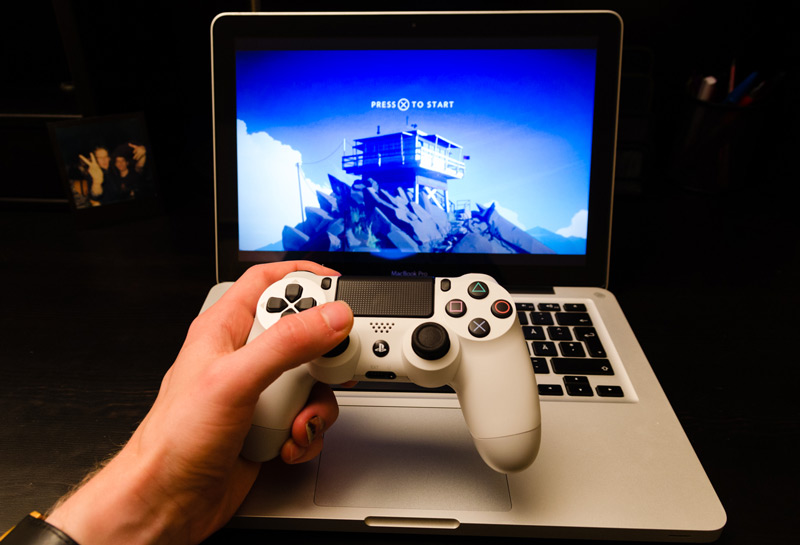
Использование приложения (Дистанционное воспроизведение PS4) для управления системой PlayStation4 с компьютера.При установке этого приложения на ПК или Mac можно использовать приставку PlayStation для игр с помощью дистанционного подключения к системе PS4.
Системное программное обеспечение версии 3.50 или более поздней
Всегда обновляйте систему PS4 до последней версии системного программного обеспечения.
Компьютер с одной из следующих операционных систем.Windows 8.1 (32-разрядная или 64-разрядная версия)Windows 10 (32-разрядная или 64-разрядная версия)Процессор Intel Core i5-560M с частотой не менее 2,67 ГГцНе менее 100 МБ свободного пространства на жестком дискеНе менее 2 ГБ оперативной памятиДисплей с разрешением 1024 x 768 или вышеЗвуковая платаПорт USB
Компьютер с одной из следующих операционных систем.OS X YosemiteOS X El CapitanПроцессор Intel Core i5-520M с частотой не менее 2,40 ГГцНе менее 40 МБ свободного пространства на жестком дискеНе менее 2 ГБ оперативной памятиПорт USB
Компьютер*Система PS4*Беспроводной контроллер DUALSHOCK4Кабель USBУчетная запись Sony Entertainment NetworkВысокоскоростное соединение с ИнтернетомДля наиболее эффективной работы приложения рекомендуется использовать высокоскоростное соединение со скоростью отправки и загрузки данных не менее 12 Мбит/с.
1.Перейдите по одной из следующих ссылок, чтобы загрузить установочный файл для (Дистанционное воспроизведение PS4). Сохраните этот файл на рабочем столе или в другом месте.
Настройка системы PS4
Перед использованием приложения необходимо выполнить следующие действия в системе PS4.
Если дистанционное воспроизведение недоступно или работает нестабильно, обратитесь к следующей информации:
Скорость соединения зависит от сетевого окружения. Для получения дополнительной информации обратитесь к своему поставщику услуг Интернета.
Названия папок и команд могут отличаться в зависимости от версии ОС.
На панели управления выберите пункт , затем удалите приложение .
Перетащите из папки приложений в корзину. Затем выберите Finder > .
Дополнительно по теме:
Steam
Уверен, эта платформа не нуждается в особом описании. После установки клиента Стим Вам не потребуется искать драйвера на геймпад Playstation.
- Запускаем приложение, входим в аккаунт;
- Вверху кликаем по пункту «Вид» и внутри включаем режим «Big Picture»:
Затем переходим к настройкам контроллера:

Отмечаем галочкой опцию «Поддержка … PS4»:
Для активации устройства стоит его выключить, а через несколько секунд снова включить, дабы оно определилось программой. Теперь можно перейти к переназначению клавиш управления (в самой игре реально зажать PS при запуске, чтобы перейти к параметрам управления).
Автор рекомендует:
- Как поставить пароль на флешку – простые и эффективные варианты
- Как найти телефон через Гугл аккаунт и другими способами?
- Как снять защиту от записи с флешки?
- Как зайти в Ватсап с компьютера – WhatsApp на ПК
- Как исправить ошибку “CPU fan error” при загрузке
Step 1: Connect your PS4 Controller via USB or Bluetooth
To use your PS4 controller on your PC, the first step you need to take is to connect it to your computer physically. There are two ways to connect your controller to your computer.
Method 1: Connect your PS4 Controller via USB
The simplest way to connect your controller to your Windows computer is to use a micro-USB cable. There are upsides of doing this. Once you connect it to your controller and your computer, you need no more further configuration. And the cable is easy to find — a regular micro-USB cable like the one used for modern smartphones will work.
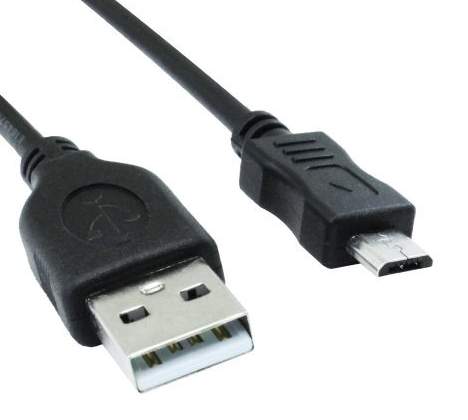
To use a micro-USB cable to connect your controller and your PC:
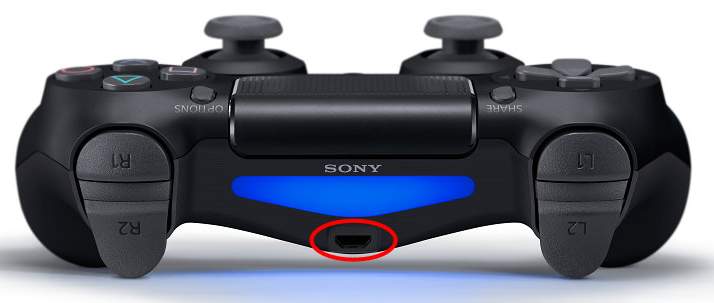
1) Plug the smaller end of your micro-USB cable into the port on the front side of your controller (below the light bar).
2) Plug the bigger end of your micro-USB cable into a USB port on your computer.
3) The cable connection is completed. You can go to the next step. (If you are on Windows 10, go directly to Step 3).
Method 2: Connect your PS4 Controller via Bluetooth
You may not like cables. Cables knot easily. They tend to create confusion. And you may wonder if you can connect it without a cable.
Yes, you can connect your controller using Bluetooth.
If your computer has the Bluetooth feature, you can pair your controller with your computer directly. But if not, you will need an external Bluetooth adapter to enable your computer to communicate with your controller.
There are two options you can try:
- Sony DualShock 4 USB Wireless Adaptor. This is the official PlayStation Bluetooth adapter that is totally compatible with your PS4 controller.
- A third-party Bluetooth USB adapter. We recommend using Kinivo BTD-400. This is a cheaper option, but is still able to recognize your PS4 controller.
To make sure your Bluetooth adapter runs perfectly, you should install the latest Bluetooth adapter driver on your computer. If you don’t know how to do this manually, you can do it automatically with Driver Easy.
Driver Easy will automatically recognize your system and find the correct drivers for it. You don’t need to know exactly what system your computer is running, you don’t need to risk downloading and installing the wrong driver, and you don’t need to worry about making a mistake when installing.
You can download and install your drivers by using either Free or Pro version of Driver Easy. But with the Pro version it takes only 2 clicks (and you get full support and a 30-day money back guarantee):
1) Download and Install Driver Easy.
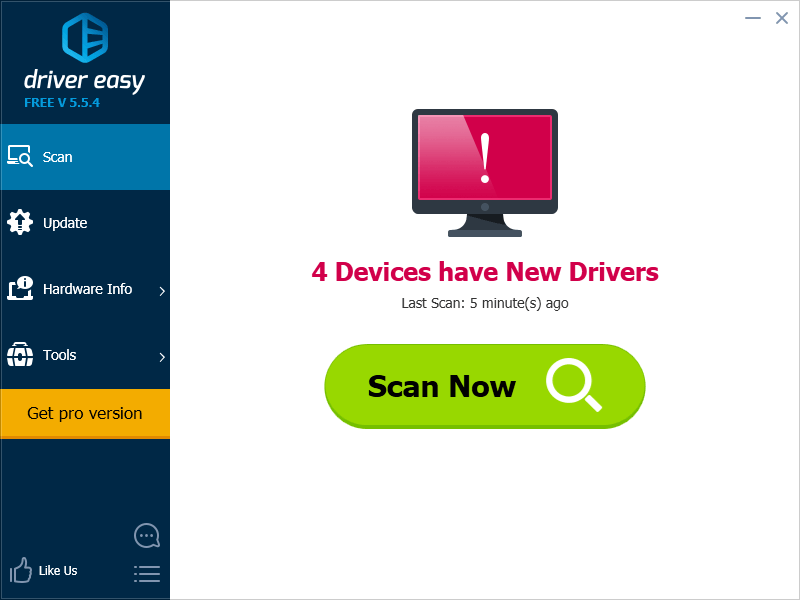
2) Run Driver Easy and hit the Scan Now button. Driver Easy will then scan your computer and detect any problem drivers.
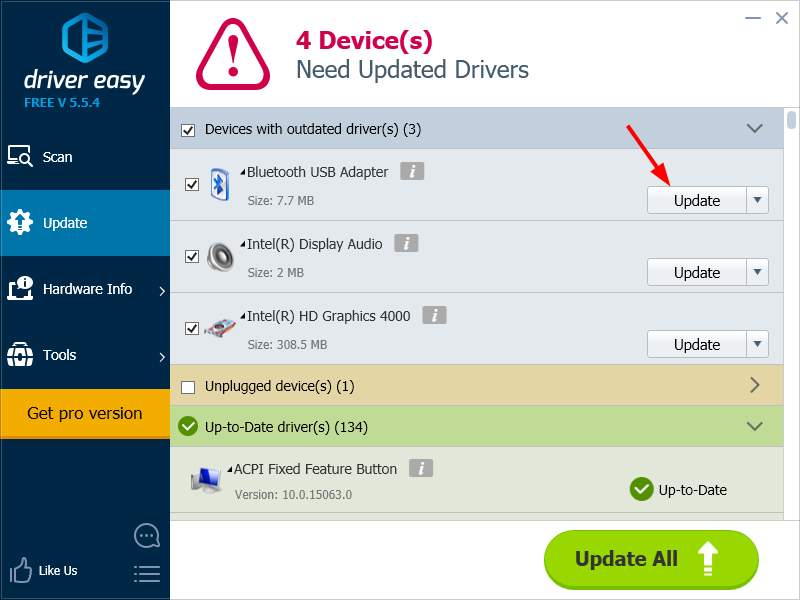
3) Click the Update button next to the Bluetooth adapter to download the latest and correct driver for it. You can also hit the Update All button at the bottom right to automatically update all outdated or missing drivers on your computer (this requires the Pro version — you will be prompted to upgrade when you click on Update All).
Once your Bluetooth adapter is ready, it’s time to connect your devices together. To do so:
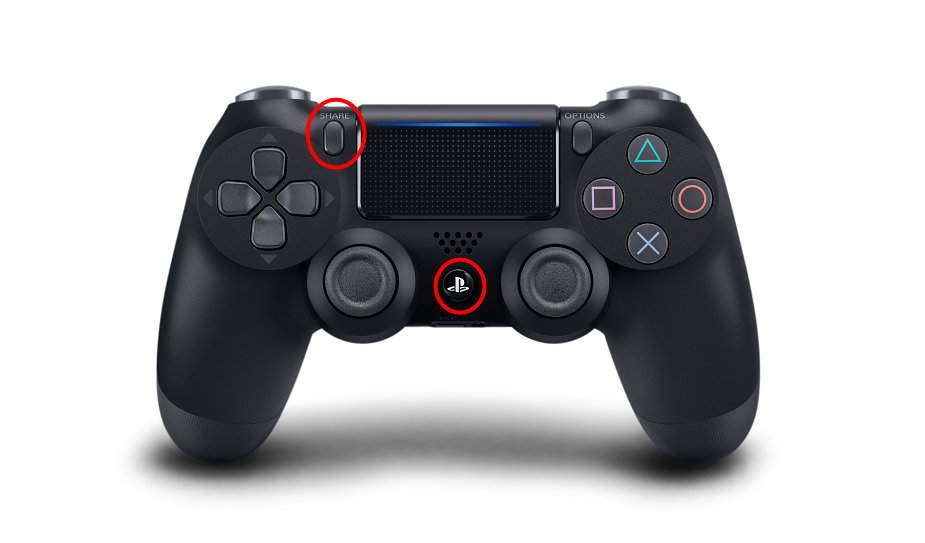
1) Press and hold the Share button and the PS button on your controller until the light bar on it starts flashing.
2) Pair your PS4 controller with your computer. Note that the steps to do this on Windows 10 is different from Windows 7. The following will show you how to pair your controller on these different systems.
If you are using a Windows 10 computer:
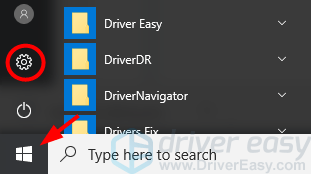
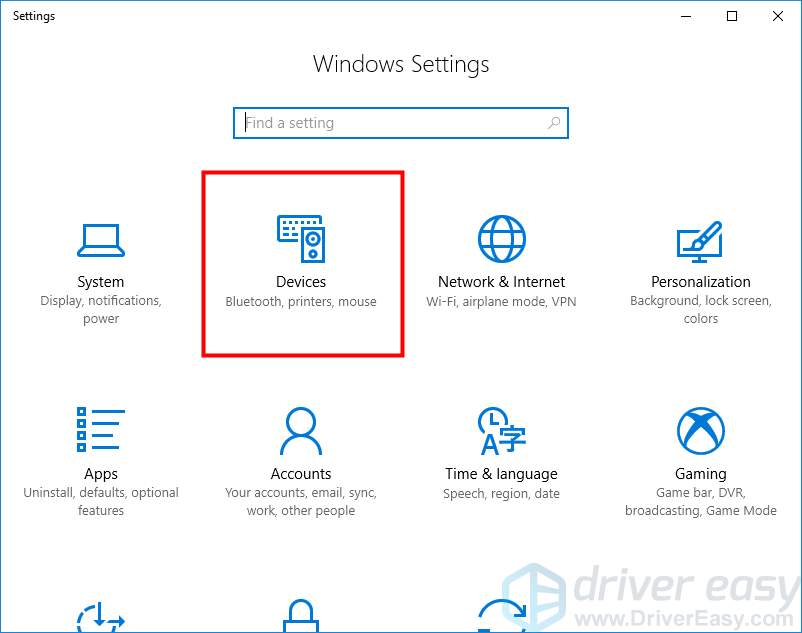
i. Click the Start button, and then click Settings.
ii. Select Devices.
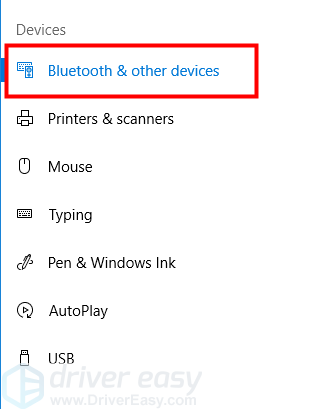
iii. Select Bluetooth & other devices.
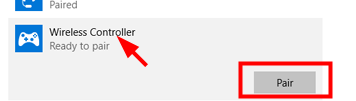
iv. Select Wireless Controller and then click Pair. The system will then pair your PS4 controller.
* If prompted for pair code, enter “0000“.
v. The wireless connection is completed. You can go to Step 3.
If you are using Windows 7, pair your controller with the steps as follows:
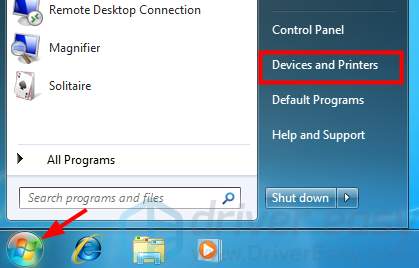
i. Click the Start button and then click Devices and Printers.
ii. Click Add a device.

iii. Select your controller and add it as a device on your computer.
* If prompted for pair code, enter “0000“.
iv. You have set up your Bluetooth connection. Please go to the next step.
Download DS4Windows
Ok, so we learn that this application is very beneficial for all those who want to use DualShock 4 on their computers. Now let’s move to the downloading guide in which I will tell you how you can easily download this app from our website.
You will notice a Download button below this guide so simply click on that button and it will redirect you to another web page.
On this page, you will see more information about this Emulator and a new button under that information.
Now again click on that button and at this time you will be redirected to the Mediafire page and here you see a green button labelled as Download Now.
Just click on that button and 5 seconds timer will start, after the timer ends the file will automatically start downloading on your computer.
Note: You may be asked to choose where you want to save the file so I would recommend choosing Desktop.
That’s it you have now successfully downloaded DS4Windows in your machine now let’s just move to our next guide.
Conclusion: DS4Windows
DS4Windows is simply the best program you can have. Get the best gaming experience using a PS4 controller on your Windows computer.
You can easily download this program and use it to connect your controller via cable or Bluetooth.
The program features a wide range of functions that allow you to fully optimize the way you play.
Select the light colors and virtually map controls. You can do almost anything you want with this amazingly user friendly program.
DS4Windows might not be your ideal support to connect your controller to Windows. In that case, you can go for the best alternative, InputMapper.
InputMapper is also an amazing program that helps you connect your PS4 controller to Windows very easily.
What do I need to emulate PS4 controller?
First of all, you need a keyboard, a mouse, or a controller. It depends on what devices you have, and what do you want to play with. Then, you need to install the PS4 controller emulator — reWASD. We’re here, at your service, emulating controllers and remapping them 🙂
Emulate PS4 controller with any other controller
Follow these recommendations to turn your gamepad to PS4 controller:
- Download and install reWASD
- Open reWASD, plug in your gamepad, and pick it in the device panel
- Create a new profile, the config is created automatically
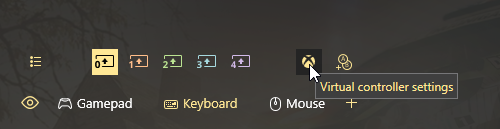
- Make sure that the setting Hide physical controller when a virtual one is created is active in Preferences:
Now it depends on what you want to achieve:
Case 1: simply turn a physical controller to PS4 gamepad
Press the magic wand below the image of a gamepad, click Virtual DS4, and press Apply. Done! Now you can enjoy the PS4 controller emulator magic.
Case 2: emulate PS4 controller and change a few (or a lot of) mappings
- First of all, make sure that the right controller type is chosen. Click on an Xbox icon above the controller, and pick Virtual DualShock 4. If you see the PS icon, leave it like that:
Now, add the mappings you would like to change with our PS4 controller emulator. Let’s say, I want a Turbo on my Right Trigger, Toggle on Left Stick click, and I also want to swap Circle and Triangle. Don’t forget to unmap controller buttons you add the mappings to avoid double input
Do all the modifications, then press Apply, and you’re good to go!
Using PS4 controller emulator for keyboard and mouse
Complete these steps to emulate PS4 controller with keyboard and mouse:
- Open reWASD, create a group of devices — of keyboard and mouse and save it
- Create the new config, change the controller type from Xbox 360 to DualShock 4 here, if needed:
Now it’s time to add some mappings to emulate PS4 controller with keyboard and mouse: press Add, pick keyboard or mouse key to remap, Unmap it, and then add a DualShock 4 mappings to it. Is you have a gaming mouse, please check out
Press Apply, and you’re good to go!
How to emulate PS4 controller for gamepad and mouse or keyboard?
- Open reWASD, create a group of devices — of controller and mouse/keyboard and save it
- Create the new config, change the controller type from Xbox 360 to DualShock 4 here, if needed:
Pick the needed sub-config in the PS4 controller emulator to add all the mappings you want. Don’t forget to unmap the controls, to mute the native controller input
Press Apply, and enjoy using your emulated PS4 controller 🙂
Here are some frequently asked questions about this PS4 controller emulator. If you don’t see anything related to your case, check out the Troubleshooting Help section in our manual.
My right stick mapped to mouse has a wrong sensitivity
Setting up your mouse to be the stick with PS4 controller emulator can be quite tricky, depending on your hardware and the game you’re playing. Make sure to check out advanced mouse settings and virtual controller settings to change the deadzone, sensitivity, and other settings!
The game doesn’t seem to detect the virtual gamepad, what do I do?
PS4 controller emulator creates the virtual controller after you press Apply, and if you have opened the game before applying the config (before you emulate PS4 controller) — the game may have focused on the physical gamepad. Try to reopen the game after you turn remap ON. If that doesn’t help — enable Autoremap, Apply the config, reboot, and then launch the game right after startup. PS4 controller emulator will work once Windows launches, and a virtual gamepad will be the first for a game to pick.
Способы подключения
Подключить Dualshock 4 к ПК можно следующими способами:
- При помощи USB (потребуется кабель microUSB-USB);
- По Bluetooth;
- При помощи фирменного беспроводного адаптера Sony.
По USB можно играть на ноутбуке или компьютере с Windows 7, Win 8 и Win 10. После включения кабеля должна произойти автоматическая инсталляция драйвера и джойстик будет распознан в качестве стандартного DirectInput. В «Диспетчере устройств» и в перечне устройств в «Параметрах» контроллер определится как «Wireless Controller».
Для того чтобы подключить геймпад от PS4 к ПК по Bluetooth, понадобится адаптер для PC и ОС не ниже Windows 8 либо встроенный модуль на ноутбуке или компе. Желательно Broadcom, они гарантировано корректно работают с контроллерами от ПС. Включите Bluetooth на PC, а затем зажмите на несколько секунд кнопки Share и PS. Если потребуется, введите на экране код 0000. Таким способом вы можете подсоединить к компьютеру до 4 Dualshock.
Хотя изначально предполагалось, что с помощью беспроводного адаптера Sony можно будет полноценно использовать все функции геймпада на персональном компьютере, на практике в полной мере он работает при воспроизведении на компьютере игр PS4. Таким способом можно подключить только один Dualshock 4. Кроме того, адаптер в последнее время не так просто найти в продаже, а стоит фирменное решение в разы дороже обычного Bluetooth-адаптера (причём с помощью простых моделей подключается до четырёх геймпадов). Процесс подключения аналогичен тому, что используется в случае с другими беспроводными девайсами.
Из плюсов использования беспроводного адаптера Sony можно назвать:
- возможность воспроизводить звук через динамик джойстика с PC;
- подключение к компу будет проходить моментально без конфликтов драйверов и без надобности их дополнительной установки и настройки.
Если просто подключить контроллер, то многие его функции, скорее всего, будут неработоспособны. Это сенсорная панель, гироскоп и акселерометр, функция вибрации, динамик и микрофон, разъём для гарнитуры. Чтобы джойстик подключался со всеми функциями необходимо установить специальное программное обеспечение.
Что делать дальше
Далее все зависит от ваших потребностей, но для начала произведём базовые настройки и манипуляции.
Во-первых, подключимся к сети через кабели или по Wi-Fi, сделать это при помощи графического интерфейса не составит труда.
Во-вторых, установим русскую локализацию.
Для этого в приложении Терминал выполним команду:
В текстовом редакторе будет открыт файл с настройками системных языков. Нужно найти строку, отвечающую за русскую локализацию (ru_RU), удалить символ “#” в начале строки и сохранить файл (Ctrl + X).
Для загрузки языка выполняем команду:
Останется изменить локализацию в системных настройках Linux или изменив локализацию в файле /etc/locale.conf. Изменения вступят в силу после перезагрузки.
В-третьих, производим обновление системы и установленного ПО.
В Linux это делается при помощи одной единственной команды:
К сожалению, из-за того, что наша сборка не является чистым дистрибутивом, в процессе обновления возникнут конфликты с уже имеющимися файлами.
Нужно выключить соответствующую проверку перед обновлением или вручную удалить файлы, на которые будет ругаться установщик.
Теперь при помощи менеджера пакетов можете установить любое предназначенное для Linux ПО.
Это может быть браузер, мессенджер, офисный пакет, редактор или просмотрщик для любого типа файлов.

Что касается игр, то можно устанавливать портированные под операционную систему игры, эмуляторы старых консолей, игры для Linux из Steam или упакованные Wine-порты игр из Windows.
Получится, например, сыграть в DOTA, CS:GO и другие “запретные” для консольщиков игры.
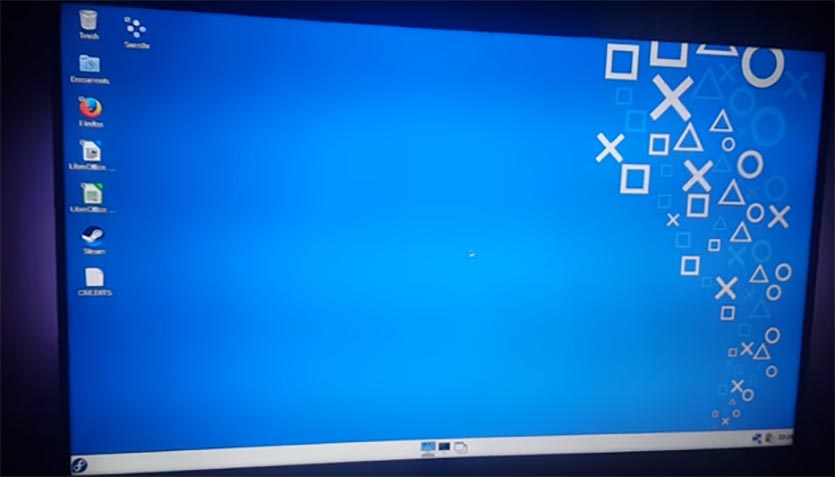
В любом случае подобные манипуляции значительно расширяют базовые возможности консоли и позволяют использовать ее в качестве компьютера для домашних и офисных задач.
![]()
iPhones.ru
Steam и DOTA 2 на PS4 — это реально!
Using a PS4 controller in Steam
- Open Steam
- Go to Settings in top left dropdown
- Open Controller tab
- Click General Controller Settings
- Register device to your account
- Change preferences
- Calibrate joysticks
- Tick PlayStation Configuration Support
- Remap from Settings Controller tab/in game
Thanks to official Steam support, there’s almost no setup involved in getting your PS4 controller working in Steam. Just be sure to pair or plug in your controller before opening Steam or any Steam games, otherwise your controller may not be recognized.
If you run into any connection issues, closing and reopening Steam should do the trick. Otherwise, try using a USB 2.0 port instead of a USB 3.0 port. DualShock 4s are weird like that.
Once connected, navigate to Steam’s settings menu—under the top left dropdown—to get everything running smoothly. Under the Controller tab, open General Controller Settings; you should see your controller listed under Detected Controllers. From here you can register it to your account, so it will remember the settings on any PC you log into.
Click Preferences to rename, or change rumble and lighting settings. You can also click Calibrate to fine-tune the joysticks and gyro if you feel the need. One important tip: click the check box next to PlayStation Configuration Support if you want to be able to do extra configuration of the controller on a per-game basis.
Back in the Controller tab of the Settings menu, you can configure your controller for Big Picture and Desktop usage, as well, and even set up Guide Button Chord Configuration.
Solution 3: Uninstalling Windows Update
Update to the latest build of Windows can obstruct the functionality of some devices connected to your PC. In case, the above solutions don’t work for you, un-installing Windows update might be a lender of last resort.
- Press Windows + I keys on your keyboard to launch Settings.
- Inside Settings, click on ‘Update and security’.
- Navigate to ‘Windows Update’ from the list on the left pane and click on ‘View installed update history’.
- On the next window, click on ‘Uninstall updates’. Wait for the list to populate all of the installed updates on your computer.
- You can organize the list based on the latest installed updates at the top. Select the update after which you started experiencing the problem and click ‘Uninstall’. Go through the un-installation wizard till the end. Restart your computer after the process is done.
Подключение джойстика при помощи Bluetooth-адаптера
Если компьютер не поддерживает Bluetooth, то вы можете использовать блютуз-адаптер, подсоединив его через USB. После подключения этого устройства вам необходимо будет выполнить соединение обычным способом. Кроме того, существует официальный адаптер от компании Sony. Подключение выполняется ещё проще:
- Подключите адаптер к компьютеру через USB.
- Дождитесь завершения установки драйвера для этого адаптера.
- После этого достаточно будет зажать кнопки Share и PS на контроллере. Подключение геймпада будет выполнено автоматически и в дальнейшем будет происходить мгновенно.
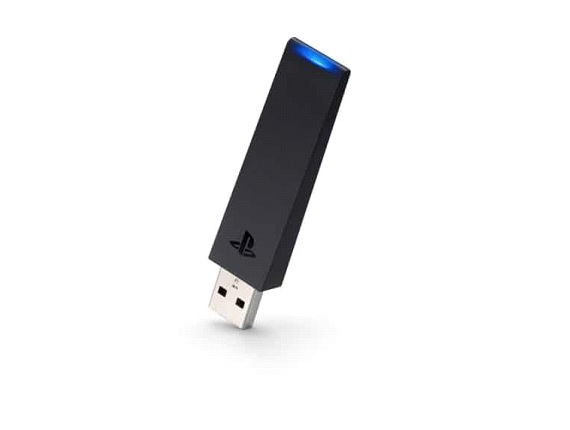
Существует официальный адаптер для подключения геймпада к ПК
USB подключение геймпада
Для подключения с помощью кабеля один его конец (на котором расположен разъем micro-USB) втыкается в джойстик, а второй конец (на нем будет стандартный USB разъем) подключается к компьютеру.
 В «десятке» заложена функция автоматического обнаружения устройств. Вот с помощью нее она должна определить новое устройство и при необходимости обновить драйвер для него до последней версии.

Дальнейшим действиям будет клик по вкладке «Bluetooth», где нам в выпадающем меню необходимо найти ссылку под названием «Другие устройства».

Также можно проверить устройство на работоспособность. Для этого переходим в блок «Сопутствующие параметры» и находим ссылку «Устройства и принтеры».

Дальше в этом разделе мы правой кнопкой щелкаем «Controller». После этого снова появится выпадающее меню, где первой в списке будет находиться строка «Параметры игровых устройств управления».

- Дальше вы увидите окно, в котором в строке «Controller» будет отмечено состояние положительного подключения. Это будет означать, что наш Dualshock 4 успешно подключен к персональному компьютеру.
- Дальше нам необходимо провести проверку работоспособности. Для этого мы набравшись уверенности смело кликаем по кнопке «Свойства».

Это действие приведет к открытию окна для проверки работоспособности геймпада. Оно будет выглядеть следующим образом.

Продолжение
Теперь обратите внимание на верхнюю часть этого окна. Там есть вкладка «Проверка».
В ней нужно понажимать все клавиши на устройстве
Результатом должен быть четкий отклик.
В противном случае необходимо переместиться в соседнюю вкладку, которая называется «параметры» и провести калибровку джойстика.
Для этого на вкладке «параметры» предусмотрена кнопка «откалибровать».

После откроется окно калибровки, где необходимо следовать всем инструкциям. Первым действиям нужно нажать кнопку «Далее».

Процесс закончится автоматически, и, чтобы сохранить новые параметры нажимаем «Применить». Процесс подключения на этом закончился, можно насладиться игрой в любимые стрелялки.
Connect the PS4 controller to your PC via Bluetooth
One of the best things about using the PS4 DualShock 4 controller on your PC is that you can use it wirelessly, giving you far more flexibility when gaming.
The PS4 DualShock 4 controller uses Bluetooth, so you’ll need to make sure your PC or laptop has a Bluetooth receiver built in. If it doesn’t, you can buy a Bluetooth USB dongle such as the ; not only is this small enough to be plugged unobtrusively into your PC, it’s also pretty cheap at just £2.99 (around US$4.55, AU$6.40).
Press this button to turn on the controller
To connect the PS4 controller via Bluetooth, press and hold the central PS Button and the Share button for three seconds until the lightbar at the top of the controller begins to flash.
Next open up the Bluetooth settings on your PC. In Windows 10, click on the speech bubble icon in the Taskbar at the bottom-right corner of your screen. This opens up the Action Center – from there click ‘Bluetooth’ and then select ‘Wireless Controller’.
You may be asked to enter a pair code – if so type in 0000. The PS4 DualShock controller will now be connected wirelessly to your PC.
Image credits: TechRadar
Troubleshooting
Some people have faced problems while using this application so that’s why I am writing some of most occurred problems and their fixes. Read these fixes if you have also faced such an issue.
Device Detection Issue
If DS4Windows does not detect your DS4 and the lightbar fails to glow orange, it is possible that your DS4 in Windows will be permanently disabled by Exclusive Mode.
If this has happened, the easiest way to test is to plug the controller into another USB port and see if it works. This issue probably occurred with the older versions of DS4Windows so if you are facing this problem then try to update the software by downloading the latest version from our website.
Check this if you have Error: Fix Exclusive Mode Not Working
If you suspect that your DS4 is disabled, open the Device Manager (Control Panel\Hardware and Sound\Device Manager) and search for devices listed in the “Human Interface Devices\HID-compliant game controller” section.
If the system icon displayed as a down arrow icon then check the phone instance path of the device and see if the device is a DualShock 4 device.
Click the device item right-click and from the menu select “Enable device.” This will allow the device to be re-enabled and apps will see it again.
Disable Steam Controller Mapping Support
Steam has enabled Xbox Configuration Support in the Steam client by default with recent updates to the Steam client at the time of writing this (2018-12-13).
What this means is that Steam must initially map a detected Xbox 360 controller to KB+M bindings (Desktop Mode) before beginning or starting a game with Steam Big Picture Mode.
This is a problem for DS4Windows as the generated digital controller Xbox 360 is mapped to KB+M behaviour for desktop mode and games launched outside the Steam client.
You need to open Steam Big Picture Mode, navigate to Settings> Controller > Controller Settings, and uncheck Xbox Configuration Support with PlayStation Configuration Support in order to use DS4Windows properly.
Enable Hide DS4 Controller Option
In some cases, detection of the controller may be slowed down by the system recognizing the physical device as both a D-pad controller (Xbox controller) and DualShock 4 controller, effectively causing a dual set of inputs that can confuse DS4 Windows to no end.
The problem is even more pronounced when it comes to playing games as the game detects two controllers rather than one. Fortunately, DS4 Windows has a useful feature that allows the user to determine whether to hide the DS4 controller or not.
- Open up DS4 Windows.
- Click on the “Settings” tab among the option running horizontally near the top of the app window.
- Next, tick the “Hide DS4 controller” box. It’s the first option at the top of the list.
- Click on the “Controllers” tab.
- Plug the DualShock 4 controller back into the PC.
- The device will appear in the app.
Best Alternative — InputMapper
Are you not completely convinced with the DS4Windows program to connect your PlayStation 4 controller? Then you do have another alternative to go with.
This program is known as InputMapper and is just as efficient as DS4Windows.
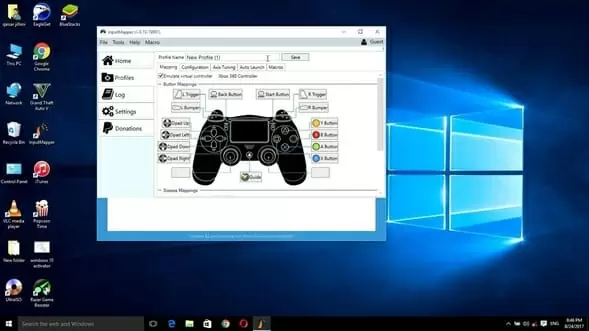
This is simply the best alternative you have. Like DS4Windows, InputMapper also allows you to connect your PS4 controller to your Windows computer using a USB cable or Bluetooth.
You can easily download this program from the link below.
It is an excellent program that allows you to easily map your controls. Create your own button combinations and perform advance functions with just a button press.
It is light, simple, and has a very friendly UI.
Steam
Steam — это сервис распространения цифровых копий игр с функциями магазина, сетевого сообщества и игровой платформы. Клиент Steam можно бесплатно скачать и установить на компьютер. Он не первый год официально поддерживает Dualshock 4, причём работает и с обычными Bluetooth-адаптерами, и с фирменным от Sony. А также можно одновременно подключать разные геймпады, и они не будут конфликтовать между собой.
Инструкция, как подключить джойстик в Steam:
- Активируйте поддержку Dualshock 4 в Steam:
- Зайдите в режим Big Picture.
- Найдите «Настройки», «Настройки контроллера».
- Включите пункт «Поддержка контроллера DS4».
- Настройте подсветку и активируйте вибрацию.
- Выключите и снова включите геймпад.
- Добавьте стороннюю игру в библиотеку. Для этого в меню справа внизу нажмите «Добавить игру».
- Запустите игру из библиотеки.
- Нажмите на контроллере кнопку PS. Появится экран настроек, зайдите в «Настройки контроллера».
- Настройте элементы управления и функции, как удобно. В играх, где нет изначально поддержки геймпадов, настроить будет сложнее. При возникновении трудностей обратитесь к сообществу конкретной игры или скачайте удачные настройки других игроков.
Если вы не хотите использовать клиент Steam, то скачайте одно из приложений, которое делает возможным корректное сопряжение DS4 c персональными компьютерами.
Update DS4 Windows

When extracting the DS4 Windows download file, you may have noticed two executable app files: DS4Windows and DS4Updater. The first starts the application, while the second is a useful update tool.
To ward off any potential problems caused by a previous buggy update that might be preventing DS4 Windows from detecting the controller, we need to install the latest update.
- Navigate to the DS4 Windows file directory.
- Open the extracted file.
- Click on “DS4Updater”.
- Allow the application to scan for the latest version and download it if required.
- You’ll know the process is complete when the “DS4 Windows is up to date” message appears on the screen.
- Close the DS4Updater window and relaunch DS4 Windows.
- Under the “Controllers” tab, make sure the device is detected and visible.