Microsoft dos diskpart command
Содержание:
- Method1: initialize a disk with Diskpart
- Программы для разбивки диска на разделы
- Using Disk Management to Create Partition
- Method 3: initialize disk with AOMEI Partition Assistant command-line
- Solution 2 — Extend volume with diskpart in Windows 10
- Create Partition with MiniTool Partition Wizard Free Edition
- Как использовать программу Diskpart, когда необходимо срочное форматирование флешки
- Alternative to DiskPart: extend Server C drive more flexibly
- Форматируем флешку защищенную от записи
- How to extend partition with Diskpart?
- Копирование файлов на флешку
- Diskpart Fails to Extend Partition in Windows 10
- Changing partition ID type
- How to format disk partition with DiskPart?
- Форматирование через командную строку командой DISKPART
- Creating a partition using parted
Method1: initialize a disk with Diskpart
Diskpart is one of Windows basic utilities with command line. You can use it to
manage your disk/partition/volume with a special command line, such as
create/delete/format/extend/shrink partitions and initialize/convert disk, etc. It
is more powerful than Windows Disk Management. To use a new disk or wipe existing
disk, the initialize disk of Diskpart can work it out. Windows snap-in tool Diskpart
initialize disk can help you use a new disk and wipe a hard disk clean with its
command line. To use it, you can do as following shows.
You need to open a command prompt first. Click Start, type “cmd” in the search bar.
Press Enter, it will pop out a command prompt. Or, you can press «WIN+R»
and type «cmd» to open the prompt. Then, type diskpart in the
prompt and press Enter.
So, here you should type «list disk» first, when it list all the disks, type «select disk, which you want to initialize.
Next, type “attributes cleared successfully” so that it can move to the next step
smoothly. Then, type “online disk”, then, the Diskpart successfully onlined the
selected disk.
Next, you can type “convert mbr” or “convert gpt” to change the selected disk to MBR
format or GPT format according to your requirements.
Once you initialized the disk and convert the disk into MBR format or GPT format, you
can create partition on it, which is pragmatic.
You can use Diskpart to create partition for you.
Программы для разбивки диска на разделы
Разделение диска домашнего компьютера на разделы можно отнести к редкой процедуре и поэтому нет смысла покупать для этих целей платное программное обеспечение с мощным функционалом.
Ниже представлены бесплатные версии программ коммерческих проектов, но для домашнего использования они бесплатны. При желании их можно расширить до профессиональных версий.
AOMEI Partition Assistant
AOMEI Partition Assistant — простой и функциональный менеджер дисков, который может не только разделить диск или объединить разделы, но и выполнить множество прочих востребованных операций: копирование диска, клонирование раздела, конвертер NTFS в FAT, преобразования диска из MBR в GPT, перенос ОС с одного диска на другой.
Официальная страница программы: https://www.aomeitech.com/aomei-partition-assistant.html.
Недостатки программы: быстрое и удобное разделение диска доступно только в платной версии AOMEI Partition Assistant, а в бесплатной придется сначала уменьшить один раздел, а затем на освободившемся пространстве диска создать новый раздел.
1. Запустите программу и кликните правой клавишей мыши по разделу или логическому диску, который хотите разделить. Выберите пункт меню «Разделение раздела».

2. Перетащите ползунок для изменения размера нового раздела или уменьшите размер раздела явно в Гигабайтах, в соответствующем окошке и нажмите кнопку .

3. Среди разделов диска появится свободное пространство. Кликните по нему правой клавишей мыши и выберите пункт «Создание раздела»

4. Укажите размер диска, букву и файловую систему и нажмите кнопку .

5. Для применения выполненных манипуляций нажмите кнопку в основном меню программы.

В случае разделения системного диска C:, на котором установлена операционная система, потребуется перезагрузка компьютера.

Компьютер будет перезагружен программой в среду Windows PE, в которой будут выполнены все необходимые операции по работе с разделами диска и по завершении загрузится операционная система Windows с измененными разделами дисков.
Minitool Partition Wizard Free
Minitool Partition Wizard Free — бесплатная версия весьма функционального и удобного менеджера разделов диска. Помимо основного функционала, работающего с разделами и файловыми системами диска, программа радует дополнительными бесплатными инструментами такими как «Анализатор пространства диска» и «Тест скорости диска»
Официальная страница программы: https://www.partitionwizard.com/free-partition-manager.html.
Недостатки программы: отсутствие русского языка.
Разбить диск на разделы с помощью Minitool Partition Wizard можно с помощью пары кликов.
1. Укажите раздел на диске, который хотите поделить и кликните в боковом меню «Split Partition».

2. Перетащите ползунок или введите число, чтобы задать размер нового раздела и нажмите кнопку .

3. Для применения заданных изменений нажмите кнопку , которая находится в левом нижнем углу.

4. Для работы программы настоятельно рекомендуется закрыть все прочие приложения и программы. После выполнения рекомендации нажмите кнопку .

Если вы планируете разделить системный диск, то для выполнения операции программа потребует перезагрузить компьютер. Нажмите кнопку .

После перезагрузки запустится консольная версия программы и выполнит все необходимые операции. Для разделения системного диска, содержащего операционную систему, потребуется подождать несколько минут. Дождитесь выполнения операций с разделами диска и проверьте результаты.
Как видите, способов разделить диск на несколько разделов вполне достаточно и каждый может выбрать для себя наиболее подходящий. Главное помните: при работе с разделами диска всегда есть риск потерять хранящуюся на нем информацию, если в этот момент произойдет какой-то сбой в работе компьютера.
Using Disk Management to Create Partition
Disk Management is not as powerful as MiniTool Partition Wizard Free Edition, but as a Windows built-in partition manager, it can complete most simple and basic partition managements like create partition, delete partition, format partition, etc.
So if you find the Diskpart create partition is a little complicated and you don’t want to resort to third-party partition software either, you can try the Windows built-in Disk Management, which is very convenient for Windows users.
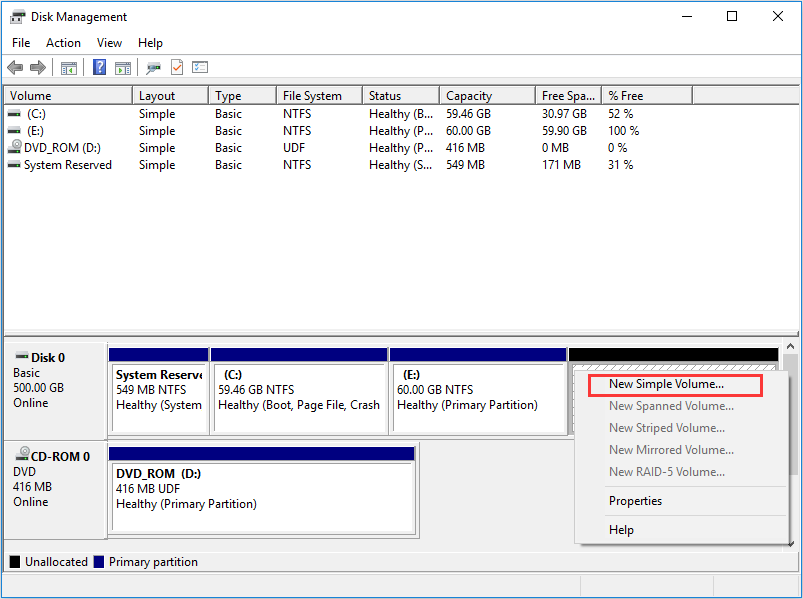
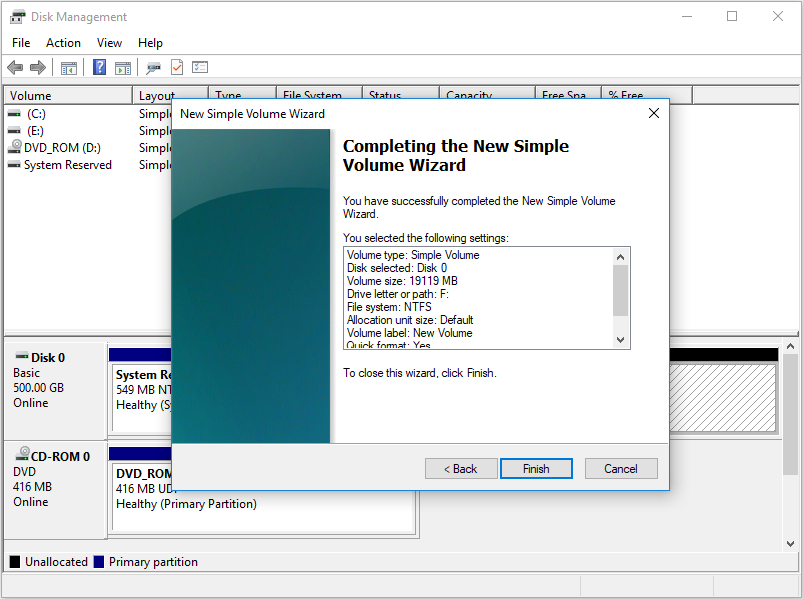
Step 1. Right-click Windows Start menu and choose Disk Management to enter into the Windows 10 Disk Management interface.
Step 2. Right-click the unallocated space and select New Simple Volume to get the New Simple Volume Wizard interface.
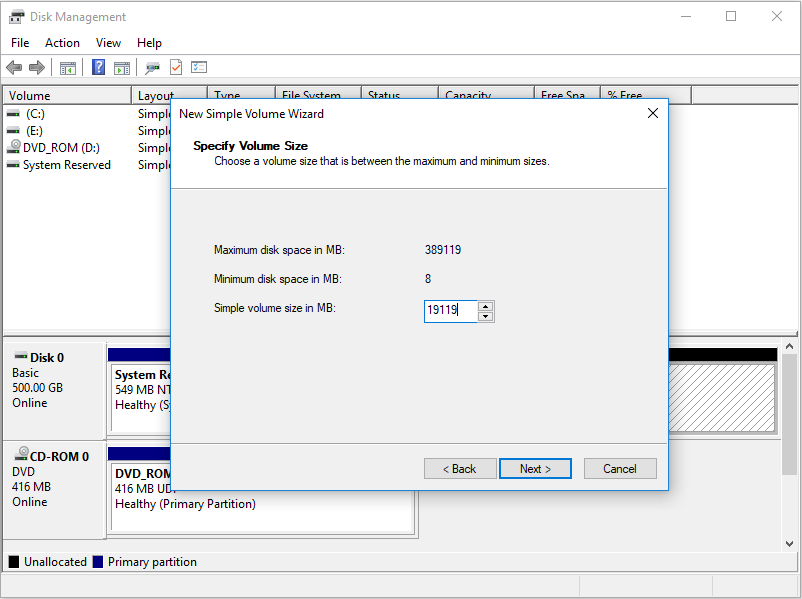
Step 3. Click Next and specify volume size.

Step 4. Input the size of the partition that you want to create and the click Next. If you don’t input a specified number, it will create a partition with all the unallocated space as default.
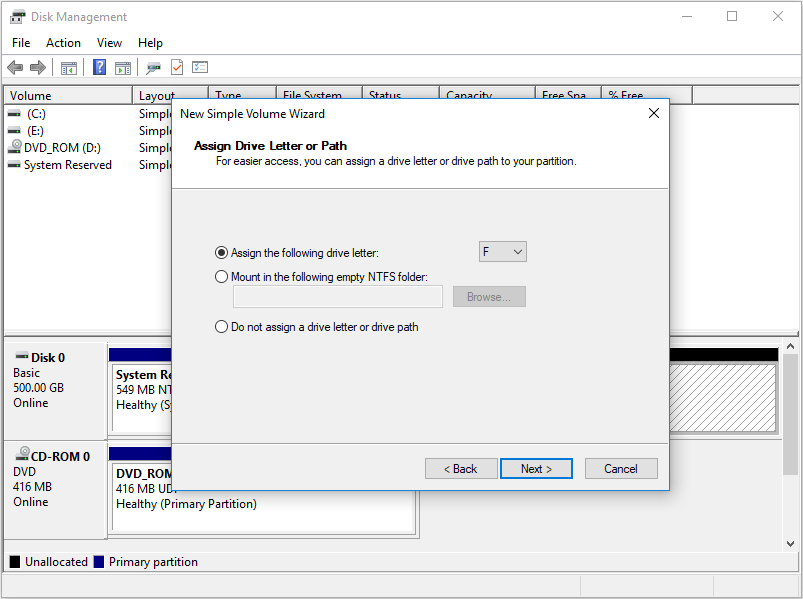
Step 5. Assign a drive letter and click Next.
Step 6. At this page, you can format the partition and set file system, allocation unit size and volume label for the partition. Then click Next to format this partition.

Step 7. Click Finish to complete creating a new partition in Windows 10.
Tip: If you fail in creating a new partition, you may check this post: Fix — Disk Already Contains Maximum Number of Partitions Error.
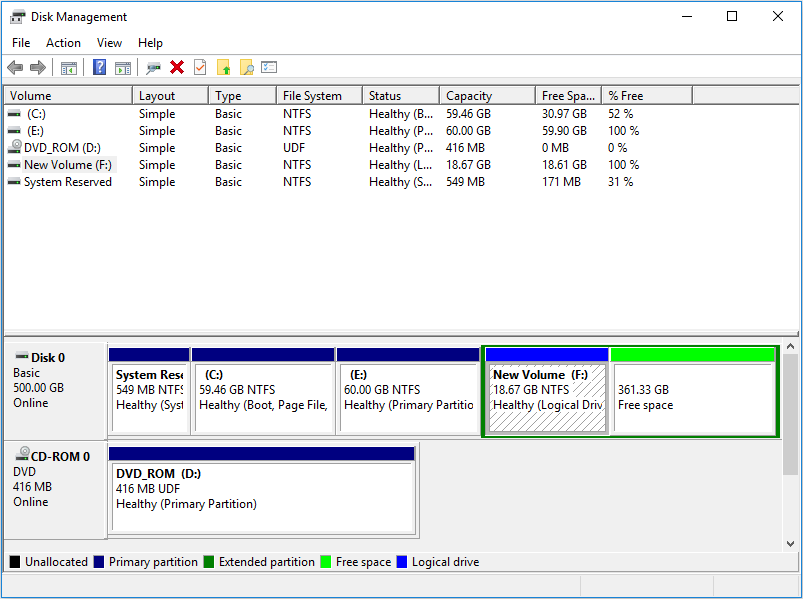
Step 8. Then when you get back to the main interface, you can see the new partition has been created.
After reading this post, you can see that diskpart is not the only way to create partition Windows 10. If you don’t like to create partition using commands, try using diskpart create partition alternatives.
Method 3: initialize disk with AOMEI Partition Assistant command-line
To use partassist.exe command line utility, click «Start» menu, type «cmd»
in the search box or press «WIN + R» keys and type «cmd» to open
a prompt, then run it as an administrator. After that, Command Prompt will open. In
the command window, type «cd + installation directory of AOMEI Partition
Assistant» to get started (e.g. cd C:\Program Files \AOMEI Partition
Assistant). Here we take an example of how to initialize a disk as GPT.
Type: cd C:\Program Files \AOMEI Partition Assistant, press Enter Key.
Then, type: partassist.exe /list, press Enter to list all disks on your computer.
When it list all disks in the command prompt, type“partassist.exe / init:1 /gpt”,
then click Enter. This opreation will convert the Disk 1 into GPT disk style.
Wait till the progress reaches 100%. It will tell you «The operation completed
successfully».
To initialize disk into MBR format with AOMEI partassist.exe, you can follow the
parameters below:
partassist.exe /init:1
Note:
“/init:1” means it initializes a disk as MBR.
No matter you use the Windows Diskpart or AOMEI partassist.exe, you can initialize
the disk to MBR format or GPT format as you want successfully. If you cannot use the
CMD in a right way, you can also use the interface of AOMEI Partition Assistant.
Partassit.exe utility can do much more for users than Diskpart. Besides initializing
disk, you can resize/move
partition without data loss, or rebuild MBR, etc.
Solution 2 — Extend volume with diskpart in Windows 10
Diskpart is a powerful partition manger built in all Windows operating system, so you can run Diskpart command to extend volume in Windows 10. As a powerful Windows built-in partition management tool, you can run Diskpart command to manage hard drive including create partition, delete partition, merge partition, extend partition, formatting partition, etc. Windows 10 Diskpart command is able to take the place of third-party partition magic to manage disk space effectively. And to some extent, Diskpart has more powerful function that partition magic, with which you can set up a dynamic disk or mirror volume, etc.
Table of Contents
Create Partition with MiniTool Partition Wizard Free Edition
MiniTool Partition Wizard Free Edition is a professional partition manager trusted by millions of user. With this all-in-one partition manager, you can reconfigure hard disk and maximize the usage of hard disk space with its functions like create partition, delete partition, move/resize partition, extend partition, merge/split partition, etc.
Besides, this software also develops many advanced features to optimize hard disk and Windows operating system with very simple steps, like align partition, convert MBR to GPT without data loss, migrate OS to SSD/HD, disk benchmark, space analyzer and so on.
Next, let’s see how to create partition Windows 10 with MiniTool Partition Wizard Free Wizard.
Step 1. Download MiniTool Partition Wizard Free Edition by clicking the following button. Install it on your computer and launch it to get its main interface.
Step 2. Here is the main interface of MiniTool Partition Wizard Free Edition. Then select the unallocated space and choose the function Create Partition from action panel to get the following interface.

Tip: If there is no unallocated space, you can resize a partition to get some unallocated space and then create a new partition.
Step 3. This interface shows the new partition is set as primary partition by default. You can change it if you want to create a logical partition. And you can also set partition label, drive letter, file system and cluster size by yourself. After making other settings, click OK to go back to the main interface.
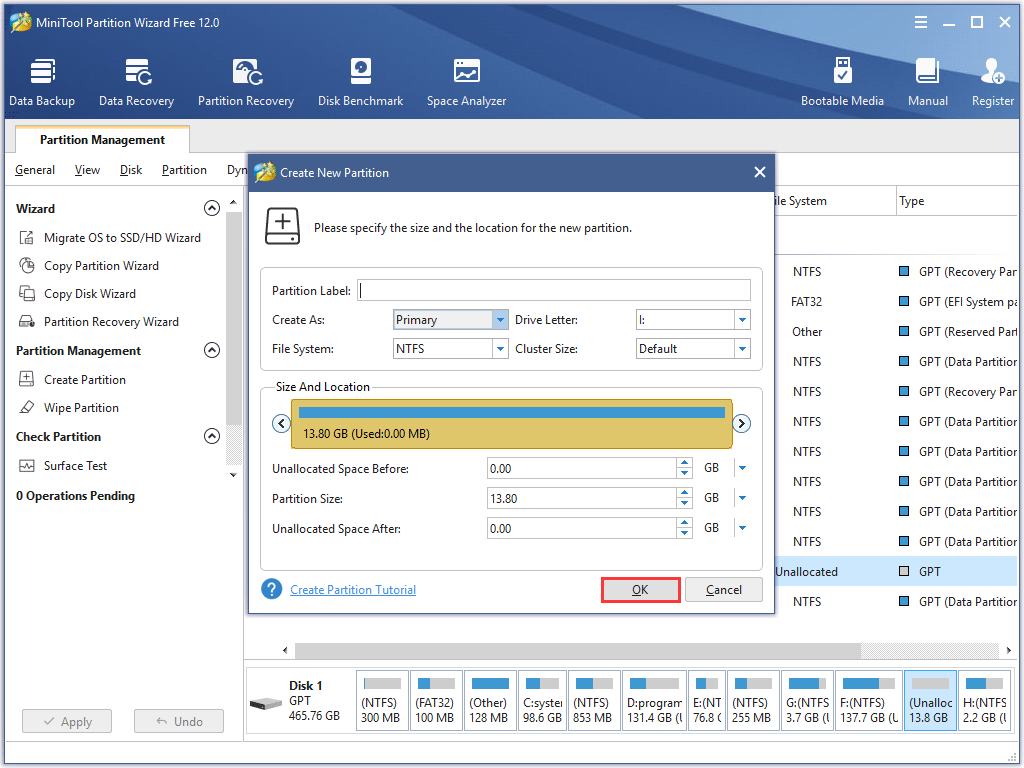
Note: If the disk has a logical partition already, to create another logical partition between 2 primary partitions is not allowed in Partition Wizard as logical partitions must be adjacent to each other.
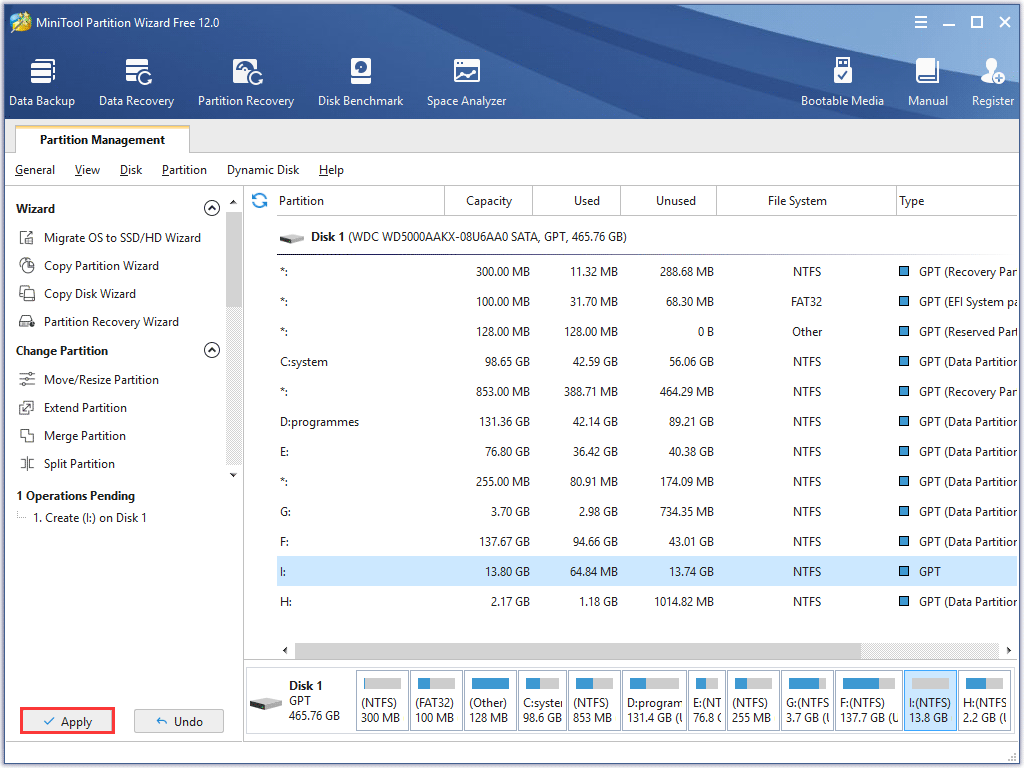
Step 4. Now you can see the new partition has been created, but this is just a preview. At this time, click Apply button on the upper left corner to apply changes.
You see! By using MiniTool Partition Wizard, you can easily create partition Windows 10.
Nowadays, tens of millions of users use MiniTool Partition Wizard Free Edition to manage their hard drives as it can help you manage partitions in an effortless way. If you don’t want to create partition using diskpart, get MiniTool Partition Wizard to help you now!
Как использовать программу Diskpart, когда необходимо срочное форматирование флешки
Такая операция вам может понадобиться при экстренном формировании загрузочного носителя, когда у вас под рукой не оказывается утилит наподобие Media Creation Tool. Всё, что от вас потребуется, — это наличие самого съёмного носителя, а также образа системы в виде ISO файла. Причем функционал, встроенный в Дискпарт, превосходит то, что вы получите от встроенной в вашу ОС возможности по форматированию.
Вам необходимо будет начать со следующей последовательности действий:
- Вставить носитель и тут же запустить командную строку с правами администратора;
- Жмите «Пуск» и вводите последовательность «cmd»;
- Появится та самая командная строка, в которой вводится «Diskpart»;
- Появится программа для форматирования флешки;
- Введите «list disc», что позволит вам отобразить все подключённые накопители flash;
- Здесь вам придётся отыскать нужную и определить её номер;
- Введите команду «select disk #».
Понятно, что вместо решётки нужно будет указать тот самый номер. Сама описываемая программа позволяет вам создавать или удалять разделы на flash-накопителе.

В качестве аналогичной команды стоит упомянуть о процедуре «clean», которая также может быть исполнена только через командную строку с соответствующими правами. Здесь вам нужно будет выполнить всё ту же инструкцию «cmd», которая вводится в поле, появившееся после вызова системного интерпретатора (WIN + R). Чтобы двигаться дальше, вы должны чётко знать, какой буквой обозначается ваш flash-накопитель. Ведь придётся вводить последовательность «format Z:», где вместо последней буквы латинского алфавита должна быть ваша. Здесь можно использовать дополнительные подкоманды, которые будут указывать сразу на тип новой файловой системы, а также на способ форматирования (быстрое или какое-то другое).

Diskpart – встроенная команда в вашу ОС. Но если вы хотите получить больше возможностей, то нужно бесплатно скачать Macrorit Disk Partition Expert Free. Это самостоятельная программа, которая никак не связана с компанией Microsoft, но именно она позволит вам очистить и отформатировать флешку любого формата, в том числе и флешку, являющуюся картой памяти – SD, microSD и т.д. Главное, чтобы вы смогли подключить устройство ко своему компьютеру на Windows 10, всё остальное за вас сделает программа.
У нас вы сможете скачать Portable версию, которая не требует установки
В случае с таким ПО, как Дискпарт, это важно. Более того, загрузка осуществляется напрямую с официального сервера разработчика, что гарантирует вам получение не только оригинала, но и самой свежей версии программы
Что выбрать — встроенную функцию, или самостоятельную программу, решать только вам.
Alternative to DiskPart: extend Server C drive more flexibly
Because there are some restrictions to use DiskPart to extend C drive in Server, you might need an alternative to perform this task more flexibly and easily. AOMEI Partition Assistant Server is worth your trying. This partition manager is compatible with Server 2003, 2008 (R2), 2012 (R2), 2016, 2019, and SBS 2003, 2011.
As for extending Sever C drive, it breaks the limitations of DiskPart Service and extends C drive more flexibly. For example, when the unallocated space is not adjacent to C drive, it allows you to move the partition between the unallocated space and C partition to the right side, making them contiguous, and then extend C partition successfully. Or you can use the “Merge Partition” feature to directly add non-adjacent unallocated space into C drive, which requires fewer steps and time. Moreover, it is able to extend both FA32 and NTFS partition.
Below are detailed steps to extend C drive by merging unallocated space into it:
Download Free Demo Server 2019/2016/2012/2008
Secure Download
Step 1. You can download the Demo Version for a free trial. Launch AOMEI Partition Assistant Server. Right-click the C drive and choose “Merge Partitions”.
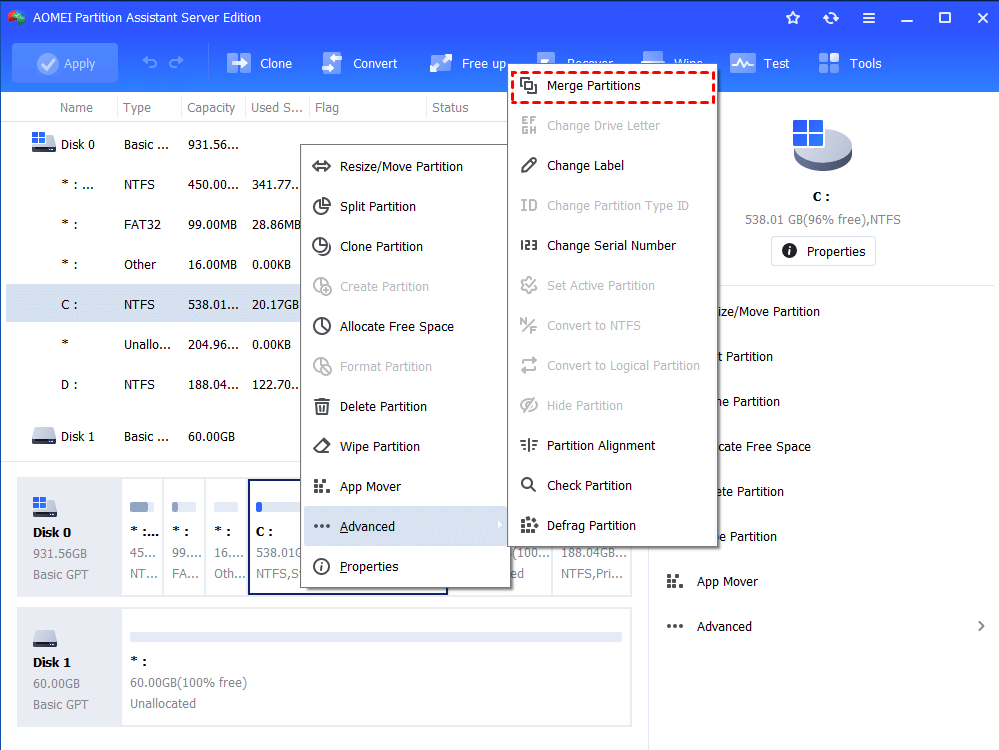
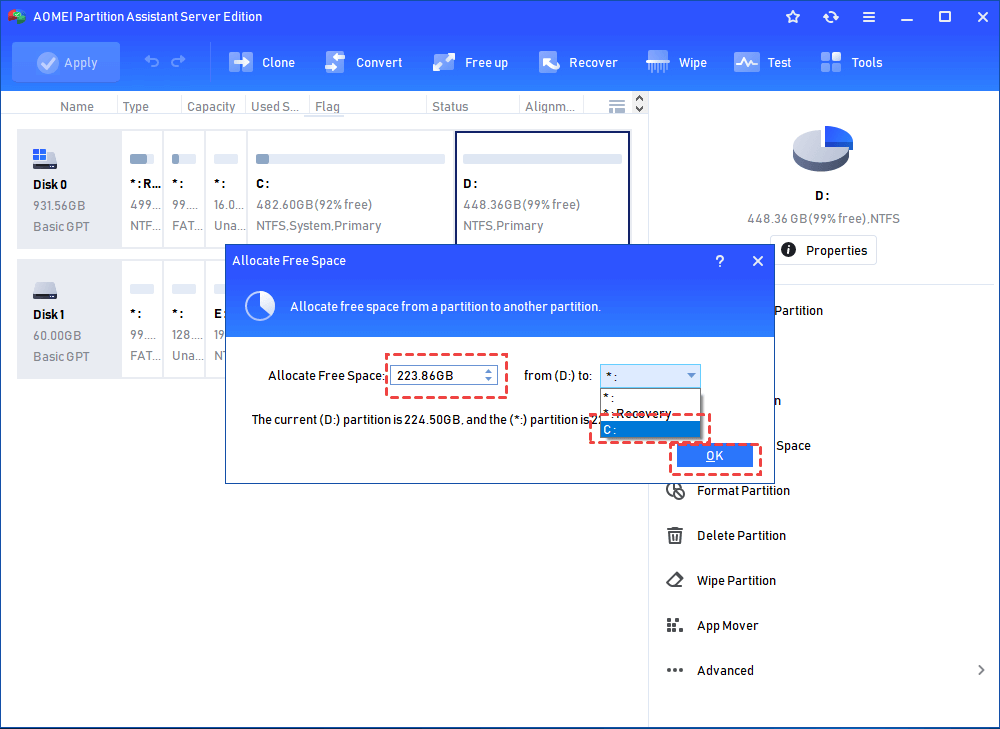
Step 2. Tick the unallocated space which is not right adjacent to C partition and click “OK”.
Step 3. Back to the main interface, click “Apply” and “Proceed” to commit the pending operation.
Wait for a while, the Server C drive will be extended with the unallocated space. Moreover, if there is no unallocated space, you can try the “Allocate Free Space” feature to directly assign some free space from one partition to another.
Форматируем флешку защищенную от записи
Часто сталкиваемся с ситуацией, когда рабочая флешка не открывается. Вместо этого появляется окно с просьбой о форматировании, но при попытки форматирования выскакивает окно с ошибкой, что не удалось отформатировать. Флешка защищена от записи. А ведь по всем признакам флешка рабочая.
И определяется в системе, и буква назначена. Обидно. Уже в принципе и не так важна хранимая на ней информация. Главное вернуть работоспособность самой флеш-накопителя, буть то обычная флешка, либо microCD, MMC и т.д. Ведь данные можно восстановить и позже.
Существует огромное количество утилит, позволяющие восстановить данные после форматирования. Ниже рассмотрим несколько самых популярных и первоочередных шагов по восстановлению работоспособности флешки, которые вы можете выполнить сами. Если данные шаги не помогут, скорее всего, проблема ниже.
Если речь идет о USB-флеш, то здесь можно попытаться сбросить контроллер. Если же про карты памяти типа microSD, MMC, то, скорее всего, восстановить ее не получится. Остается только выкинуть. Но не стоит отчаиваться. Сперва пройдем по пунктам, приведенным ниже в данной статье.
Шаг №1
Очень частая проблема — это невнимательность. Вы можете не заметить или не знать, что флешка механически защищена от записи с помощью переключателя «look — unlook». Может вы нечаянно задели и переключили полозок в положение «look», хотя это сделать не просто. Проверьте положение переключателя. Правильное положение с возможностью записи — «unlook».
Шаг №2
Приступим непосредственно к форматированию накопителя с использованием консольной командной строки.
Для этого откроем окно команды «Выполнить». Откроем меню «Пуск» -> «Выполнить», либо нажатием сочетания клавиш «Win R».
В открывшемся окне введем команду форматирования:
FORMAT H: /q /fs:fat32
где:
format — сама команда, запускающая форматирование;
h — буква диска выбранного устройства форматирования;
q — параметр быстрого форматирования (если не использовать данный параметр будет выполнено полное форматирования раздела);
fs — параметр выбора файловой системы;
fat32 — вид файловая система (fat, fat32, ntfs)
Вид файловой системы можно не указывать. Если вы не указали, форматирование выполнится с учетом той файловой системы, диск которой был размечен раньше.
Нажимаем «ОК». Появляется окно форматирования, в котором в процентах указывается прогресс выполнения команды. По окончании форматирования (100%) нажмите «Enter». Окно закроется. Форматирование выполнено.
Шаг №3
Удаление защиты записи с помощью программы diskpart.
Для начала запускаем командную строку от имени администратора.
- в Windows 7 найдите ее в меню пуск, кликните по ней правой кнопкой мыши и выберите пункт «Запуск от имени администратора»
- в Windows 8 и 8.1 нажмите на клавиатуре клавиши Win (с эмблемой) X и в меню выберите пункт «Командная строка (администратор)»
В открывшемся окне командной строки введем следующие команды по порядку:
1. diskpart
2. list disk
3. select disk N (где N — число, соответствующее номеру вашей флешки, будет показано после выполнения предыдущей команды)
4. attributes disk clear readonly
5. clean
6. create partition primary
7. format fs=fat32 (или format fs=ntfs, если требуется форматировать в NTFS)
8. exit
Данной последовательностью команд мы снимаем защиту от записи и запускаем форматирование накопителя. При удачном форматировании вы получите сообщение об успешном форматировании тома.
Шаг №4
Проверяем системный реестр Windows. Флешка может быть защищена от записи в случае повреждения реестра. Праверим правильность установленных значений ключей реестра. Для этого запустим сам реестр.
Нажмем меню «Пуск» -> «Выполнить», либо сочетание клавиш «Win R» и введем команду «regedit». В открывшемся редакторе реестра откроем ветку:
HKEY_LOCAL_MACHINESystemCurrentControlSetServicesUSBSTOR
Найдите параметр «Start». Его значение должно равняться 3. Если установлено иное значение, нажмите правой кнопкой по параметру «Start» -> «Изменить» и введите 3. Защита от записи снята.
Шаг №5
Убираем защиту от записи в редакторе групповых политик Windows
Возможно включена защита от записи в редакторе групповых политик Windows. Чтобы открыть редактор нажмите сочетание клавиш «Win R» и введите команду gpedit.msc и нажмите «ОК»
В редакторе групповых политик перейдите по ветке «Административные шаблоны» -> «Система» -> «Доступ к съемным запоминающим устройствам»
Обратите внимание на пункт «Съемные диски: Запретить запись». Если для этого свойства установлен параметр «Включено», то кликните правой кнопкой мыши по нему и выберете «Отключено», после чего нажмите кнопку «ОК»
Шаг №6
How to extend partition with Diskpart?
To extend the partition as you need, you can make use of Diskpart, a native disk management tool of Windows operating system. You can use it to extend an existing volume/partition by following the next steps.
Step1. Open the command-line window by clicking “Start”, typing: “cmd”, or you can press “WIN+R” and type “cmd”. In the command prompt, type ”diskpart”, press Enter to launch Diskpart window.
Step 2. At the Diskpart prompt, type: list disk and press Enter.
Then, all disks will be list at the prompt.
Step 3. Then, type: select disk n and press Enter.
n means disk number. Here, you choose the disk which has the partition you want to extend.
Step 4. Type: list partition and press Enter.
The partition(s) on the selected disk will be listed.
Step 5. Then, you can select the partition which you want to extend. Type: select partition n and press Enter.
n is the partition number you want to extend. Please make sure there is unallocated space behind the partition you want to extend.
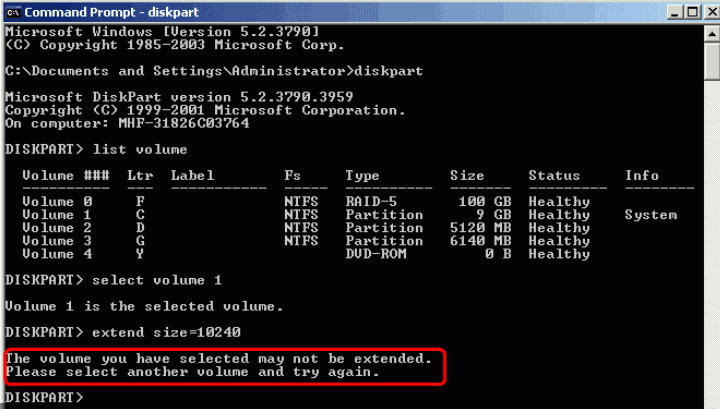
Step 6. Type: extend size=n and press Enter.
n is the size in MB you want to add the partition.
Then, it will remind you that Diskpart successfully extended the volume. Here is a screenshot of the details.
When you’re finished, type exit to end up this progress. If you are extending volumes on a dynamic disk, you can use “volume” to replace “partition”.
- ★However, Diskpart has the following restrictions when extending partitions:
- It can only extend volumes created on dynamic disks, not the volumes created on the basic disk that you have upgraded. If you want to extend a volume on basic disks, you will receive the error” Diskpart failed to extend the volume. Please make sure the volume is valid for extending.”
- To extend a basic volume, it must be raw or formatted with NTFS file system.
- It can only extend a volume that is followed by an adjacent unallocated space. If not, you may need to delete the neighboring partition.
Копирование файлов на флешку
Следующим этапом станет копирование установочных файлов программы на флеш-накопитель. Копировать нужно все файлы полностью со всей структурой и каталогами.
Сделать это можно с применением стандартных инструментов Windows типа «Проводник». Если вы хотите в силу разных возможных причин сделать это с помощью той же самой командной строки, то в этом вам помогут следующие команды:
- Улучшенная команда копирования «robocopy», в отличие от устаревшей «copy» может копировать вложенные папки со всем содержимым. В качестве первого аргумента команды выступает путь к копируемым файлам, а второго — путь к папке, в которую будет выполнено копирование файлов. Для копирования вложенных папок необходимо добавить третий аргумент «/E», иначе будет скопированы только файлы. Например, чтобы скопировать все файлы с диска f на флешку с именем g: вам требуется ввести команду: robocopy f: g: /E
- Устаревшая команда копирования файлов «copy», воспользовавшись которой можно скопировать только файлы (папки придется создавать вручную командой «md»). В качестве первого аргумента команды выступает путь к копируемым файлам, а второго — путь к папке, в которую будет выполнено копирование файлов. Чтобы дать понять команде, что вы хотите скопировать не один файл в папке, а все файлы, в качестве имени файла укажите код «*.*».
- Команда смены диска, формат которой такой: ДИСК:. Т.е. для перехода на диск «D:» необходимо ввести такую команду: d:
- Чтобы выбрать директорию, расположенную в текущей папке введите cd <�имя директории>, например: cd win10
- Для перехода на верхний уровень файловой иерархии введите cd
- Для перехода к родительской папке напишите cd ..
- Чтобы посмотреть перечень файлов текущей папки, введите команду dir
- Для создания папки запустите команду md <�имя папки>
Знания указанных команд достаточно для успешного копирования файлов на флешку.
Вот как это будет выглядеть для случая копирования установочных файлов, расположенных на диске d:win10 и флешки с именем «G:». Подготовка и запуск robocopy:
Через определенное время все файлы будут успешно скопированы:
Чаще всего загрузочный флеш-накопитель используют для установки либо переустановки операционной системы. При отсутствии дисковода можно воспользоваться виртуальным DVD-приводом и файлом-образом.
При установке операционной системы с загрузочного флеш-накопителя, в BIOS необходимо изменить настройки так, чтобы компьютер загружался именно через это устройство.
Diskpart Fails to Extend Partition in Windows 10
In fact, some people also realize that it is a common situation to fails extend partition in Windows 10 with Diskpart command. After following the steps above to send out order to extend the selected volume by Diskpart command, many people finally fail to expand the size of selected volume because Diskpart shows a message «The volume you have selected may not be extended. Please select another volume and try again».
Why Diskpart cannot expand volume in Windows 10?
If you failed to extend the selected volume after running Diskpart command on Windows 10, you can check following points:
1. Open Windows 10 Disk Management to see if there is unallocated space. If there is no unallocated space, you can right click a volume that has much free space and select «Shrink Volume» option
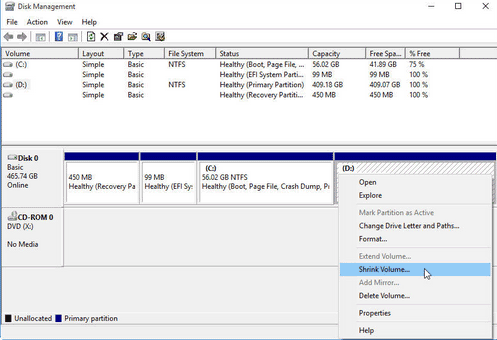
Now, you can enter the amount of space to shrink and then click «Shrink» button
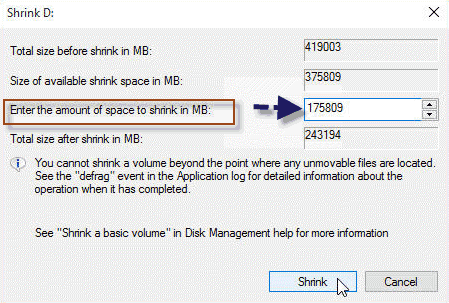
You can see some unallocated space when the shrinking process is completed.

2. Even if there is unallocated space, you have to make sure that the unallocated space is contiguous to the selected volume you want to extend. Diskpart will still fail to expand the selected volume on Windows 10 if there is no contiguous unallocated space.
3. Diskpart cannot extend system partition, so you will fail to extend the selected volume if you run Diskpart command to expand system partition on Windows 10.
4. Diskpart only supports to extend NTFS data volume, which means that you will also fail to extend the selected volume with Diskpart command when you attempt to extend an FAT32 volume on Windows 10.
Changing partition ID type
As stated earlier in the post, When you create a new partition, the partition ID type automatically defaults to Linux (83). You also have an option to change the partition type later on.
In order to change partition type you will need to change the ID. This will allow you to change the type between several different options. In this example we are going to change the type ID of /dev/sdb1. Use the option t to change the partition ID type. You can use L option to list out available partition ID types.
# fdisk /dev/sdb
Welcome to fdisk (util-linux 2.23.2).

Changes will remain in memory only, until you decide to write them.
Be careful before using the write command.


Command (m for help): p

Disk /dev/sdb: 21.5 GB, 21474836480 bytes, 41943040 sectors
Units = sectors of 1 * 512 = 512 bytes
Sector size (logical/physical): 512 bytes / 512 bytes
I/O size (minimum/optimal): 512 bytes / 512 bytes
Disk label type: dos
Disk identifier: 0x96151d76

   Device Boot      Start         End      Blocks   Id  System
/dev/sdb1            2048     2099199     1048576   83  Linux
Command (m for help): t
Selected partition 1
Hex code (type L to list all codes): L

 0  Empty           24  NEC DOS         81  Minix / old Lin bf  Solaris
 1  FAT12           27  Hidden NTFS Win 82  Linux swap / So c1  DRDOS/sec (FAT-
 2  XENIX root      39  Plan 9          83  Linux           c4  DRDOS/sec (FAT-
 3  XENIX usr       3c  PartitionMagic  84  OS/2 hidden C:  c6  DRDOS/sec (FAT-
 4  FAT16 8e
Changed type of partition 'Linux' to 'Linux LVM'
Finally, save and exit fdisk with the write/quit command (w). Note: Changes will be permanent after this command is executed.
Command (m for help): w
How to format disk partition with DiskPart?
To format disk partition, you can use the Disk Management tool, or right-click on a
drive in Windows Explorer and select the «Format…». If you would rather use a command line to format the drive, DiskPart would be the first choice, and it does have many advantages. For example, if you would like to reformat a drive
which had an operating system on the drive, you can find there are system partitions
on the drive which cannot be formatted by Disk Management and cannot be seen in
Windows Explorer. But, how to format disk using DiskPart?
Diskpart is an amazing tool that can manage disks by typing the relative syntax. You can format a local drive or an external hard drive for the use of file storage in your Windows OS environment. And here, you can see how to format hard disk using CMD
step by step.
Tip: Format disk partition will erase everything on it. It is necessary to make a full backup before formatting.
1. To use the command line to format a hard drive, you need to open the command
prompt first. Here you can click Start, type «cmd»,
right click it and select «Run as Administrator», or you can
press «WIN+X» and select Command Prompt (Admin)to open the command prompt.
2. Type diskpart to open the diskpart command prompt.
3. Type list volume, press Enter, all the volume will be list.
4. Type select volume n, press Enter, the volume you want to format
will be selected.
5. Then, type «format fs=ntfs quick label=test» and press Enter.
Then, the DiskPart format quick, like the screen shot shows.
Tips: you can change the «test» into any label you like,
e.g. «label=Data».
Finally, you can create partition on the formatted partition, or assign a drive letter for it directly. You can type «exit» and press Enter to close the command prompt. Till now, you can see the newly formatted drive in My
Computer and make use of it.
Форматирование через командную строку командой DISKPART
Рассмотренный выше вариант с командой Format позволяет выполнить удаление всех данных с имеющихся на диске разделов, проведя их форматирование
Но при этом данная команда не позволяет объединиться разделы и полностью стереть из жесткого диска, что может быть важно, например, при полной переустановке операционной системы и создании размеров определенного объема под различные задачи
Команда DISKPART позволяет провести форматирование в двух вариантах — первый предполагает выбор конкретного тома для форматирования, то есть практически идентичен тому, что был рассмотрен выше, а второй позволяет форматировать не отдельный том, а отдельный диск.
Чтобы отформатировать том через DISKPART нужно выполнить следующие действия:
Запустите командную строку от имени администратора компьютера;
Введите и используйте команду diskpart;
Введите и используйте команду list volume, чтобы отобразить список доступных томов, на которые разделены диски компьютера;
Определитесь по типу, размеру и состоянию, отображенным в командной строке, какой именно из томов вам нужно редактировать. После этого выберите данный том при помощи команды select volume 3 (в зависимости от выбранного тома, будет меняться цифра);
Командная строка примет информацию, что далее работа проводится с данным томом, после чего нужно выполнить команду для форматирования: format fs=fat32 quick
Обратите внимание, как и в первом варианте с форматированием при помощи команды FORMAT, здесь можно выбрать формат FAT32 или NTFS при выполнении команды, а также указать или убрать значение quick, определяющее, что действия будут исполнены быстро.
Когда появится сообщение, что DiskPart успешно отформатировала том, это указывает на то, что можно закрывать командную строку.
Чтобы отформатировать диск через DISKPART, нужно выполнить следующие действия:
- Введите и используйте команду diskpart;
- Введите и используйте команду list disk, чтобы отобразить список доступных дисков на компьютере;
- Определитесь по типу, размеру и состоянию, отображенным в командной строке, какой именно из дисков вам нужно отформатировать. После этого выберите данный диск при помощи команды select disk 1 (в зависимости от выбранного диска, будет меняться цифра);
- Командная строка примет информацию, что далее работа проводится с данным диском, после чего нужно выполнить команду для очистки: clean.
- Для дальнейшей работы с диском на нем нужно создать раздел командой create partition primary;
- После этого выполняется полное форматирование созданного тома командой format fs=fat32 quick, как и в рассмотренных выше вариантах, можно указать NTFS вместо FAT 32.
- Когда действия будут выполнены успешно, в командной строке появится сообщение, что команда DiskPart отформатировала том, на этом можно считать работу завершенной. После этого на диске будет создан один раздел.
Creating a partition using parted
1. Select the hard disk to be partitioned
Select the disk on which the partition is being created, in the below example /dev/sdb is being partitioned. You can select the disk in below given two ways.
# parted /dev/sdb
GNU Parted 3.1
Using /dev/sdb
Welcome to GNU Parted! Type 'help' to view a list of commands.
(parted)
or
# parted
GNU Parted 3.1
Using /dev/sda
Welcome to GNU Parted! Type 'help' to view a list of commands.
(parted) select /dev/sdb
Using /dev/sdb
(parted)
It is possible to execute “help” to see the various options provided in parted command
2. Set partition table type
The following example creates a new partition table by using the mklabel command. The disk label type must be one of the following: aix, amiga, bsd, dvh, gpt, mac, msdos, pc98, sun, or loop.
(parted) help mklabel
  mklabel,mktable LABEL-TYPE               create a new disklabel (partition table)

	LABEL-TYPE is one of: aix, amiga, bsd, dvh, gpt, mac, msdos, pc98, sun, loop
In the above output, it is possible to see that different LABEL-TYPEs are supported in parted. It is important to note that one will require to use msdos as LABEL-TYPE for generic Linux.
(parted) mklabel msdos
Warning: The existing disk label on /dev/sdb will be destroyed and all data on this disk will
be lost. Do you want to continue?
Yes/No? Yes
3. Check free space and existing partitions
To check free space and any existing partitions on the disk use the print sub-command. As you can see 21.5GB space is free on the disk and no partition is created yet on the disk.
(parted) print free
Model: VMware, VMware Virtual S (scsi)
Disk /dev/sdb: 21.5GB
Sector size (logical/physical): 512B/512B
Partition Table: msdos
Disk Flags:

Number  Start   End     Size    Type  File system  Flags
        32.3kB  21.5GB  21.5GB        Free Space
(parted) print
Model: VMware, VMware Virtual S (scsi)
Disk /dev/sdb: 21.5GB
Sector size (logical/physical): 512B/512B
Partition Table: msdos
Disk Flags:

Number  Start  End  Size  Type  File system  Flags

(parted)
4. Creating Primary or Logical Partition in Selected Disk Using mkpart
One can create either Primary or Logical partitions using mkpart command. Options can be primary and logical respectively. Example for both options are shown as below (we will create 2 partitions of 200MB each as primary and logical partition) :a. Creating primary partition
(parted) mkpart primary
File system type?  ? ext4
Start? 0
End? 200MB
Warning: The resulting partition is not properly aligned for best performance.
Ignore/Cancel? I
(parted) print
Model: VMware, VMware Virtual S (scsi)
Disk /dev/sdb: 21.5GB
Sector size (logical/physical): 512B/512B
Partition Table: msdos
Disk Flags:

Number  Start  End    Size   Type     File system  Flags
 1      512B   200MB  200MB  primary
b. Creating logical partition
(parted) mkpart logical
parted: invalid token: logical
Partition type?  primary/extended? extended
Start? 201M
End? 402M
(parted) print
Model: VMware, VMware Virtual S (scsi)
Disk /dev/sdb: 21.5GB
Sector size (logical/physical): 512B/512B
Partition Table: msdos
Disk Flags:

Number  Start  End    Size   Type      File system  Flags
 1      512B   200MB  200MB  primary
 2      201MB  402MB  200MB  extended               lba
NOTE: Parted asks for the FS-Type while creating primary partition unless a logical partition is to be created.